It's surprisingly easy to end up with a multi-bike household, and inevitably some of those bikes need to be stored somewhere out of the way. This guide will show you how to build a strong and safe bike hoist that makes it easy to lift your bikes overhead when you're not using them.
There are a few existing retail options like this one or Harbor Freight's amazingly cheap one, and some other DIY guides. However, none of these suited my requirements:
- I have exposed beams in my ceiling, and I wanted the hoist to be able to sit up between the beams so the bikes could be up higher. Hoists that expect a flat ceiling are out.
- I want to hold the bike up in such a way that it can't be easily knocked down. I will have multiple bikes side by side, so I don't want one to knock the other off as I move them about, and I also live in an earthquake-prone part of the world. The exising bike hoist kits used hooks that could let the bike fall if bumped.
- I want to suspend the bikes in a way that won't harm the bikes. Seat and handlebars are fine, and so are wheels, but some bike storage options have the bike suspended by its top tube like these abominations, which is a no-go. Read your bike manual; I bet it says not to do that.
- I want to be quite confident in the strength of the system since I'll be walking beneath it, so I want more than stamped sheet metal parts.
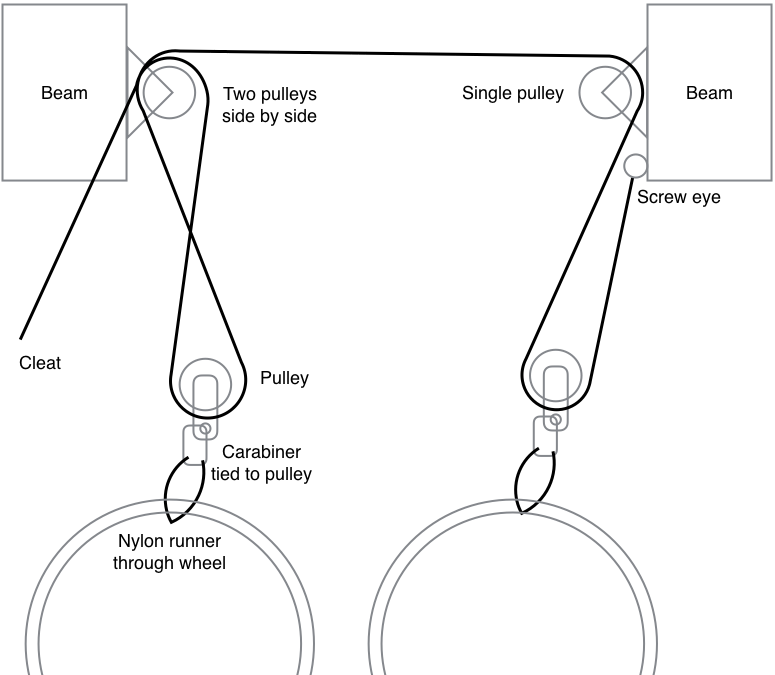
I settled on the following layout:
To build this, you'll need the following:
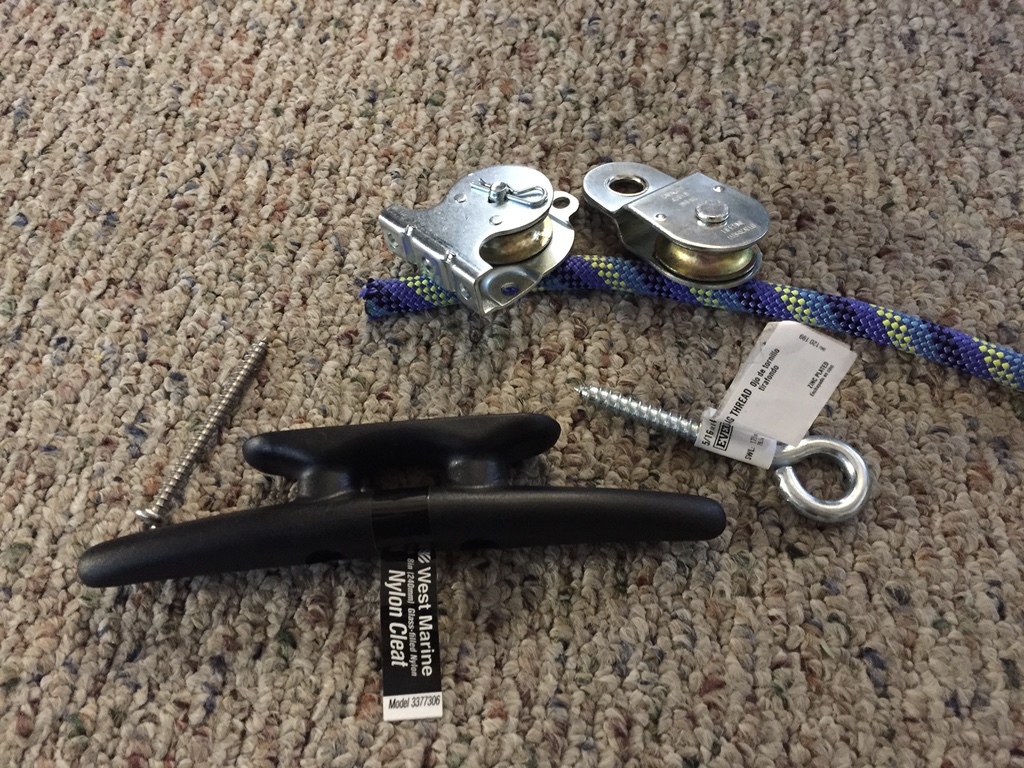
- 3x ceiling/wall-mount pulleys. These will be screwed in place. I used 1 1/2" pulleys.
- 2x regular pulleys. These will be hanging from ropes.
- 1x fair-sized screw eye. This will be where one end of the rope is tied off.
- 9x #14 screws, 3 for each ceiling pulley. Since the head will be tight against the pulley body, try to get a "cheese head", "pan head", or "button head" screw, as opposed to countersunk or "flat head". Countersunk screws will be strong enough and all that; it just won't look as tidy. They should be as long as possible given how much wood you have available, e.g. a 3" screw if you're going into a 2x4, plus drywall, etc. #14 is what fits into the pulleys I've linked to, so if you get different pulleys just use the largest size that fits.
- 1x 8" cleat. This will be where the rope is tied and untied when raising or lowering the bike.
- 2x #14 screws for the cleat, as long as will fit into whatever wood you are screwing into. Make sure to take into account the height of the cleat, drywall, etc. The cleats I have have countersunk holes, so countersunk screws are fine here.
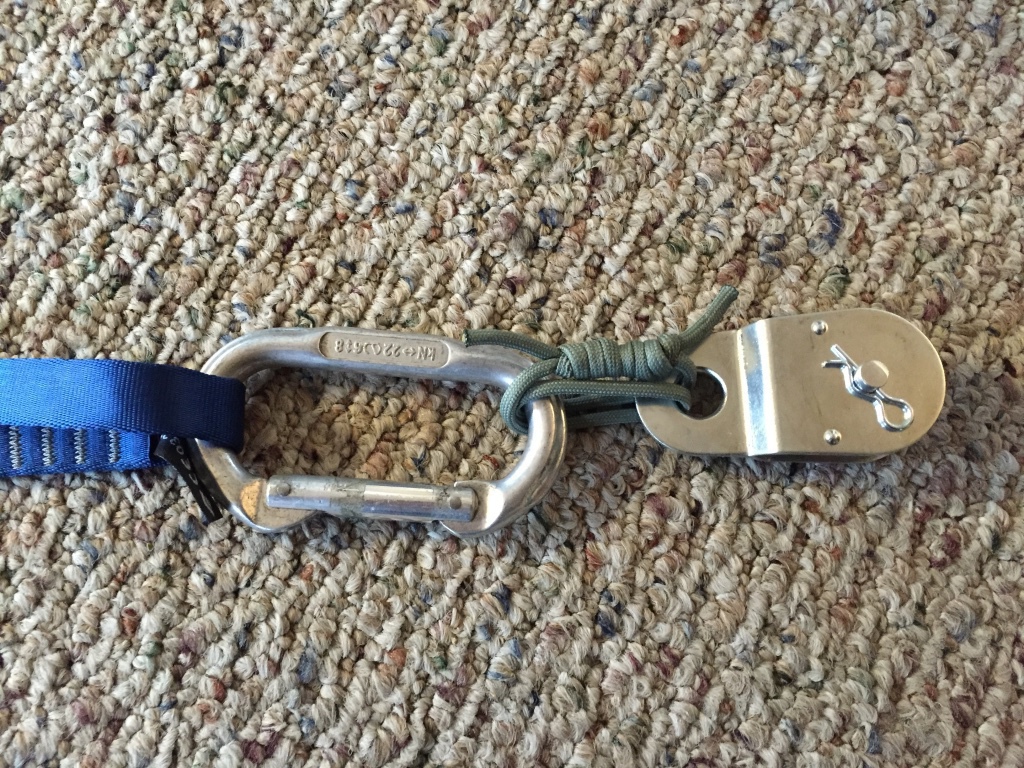
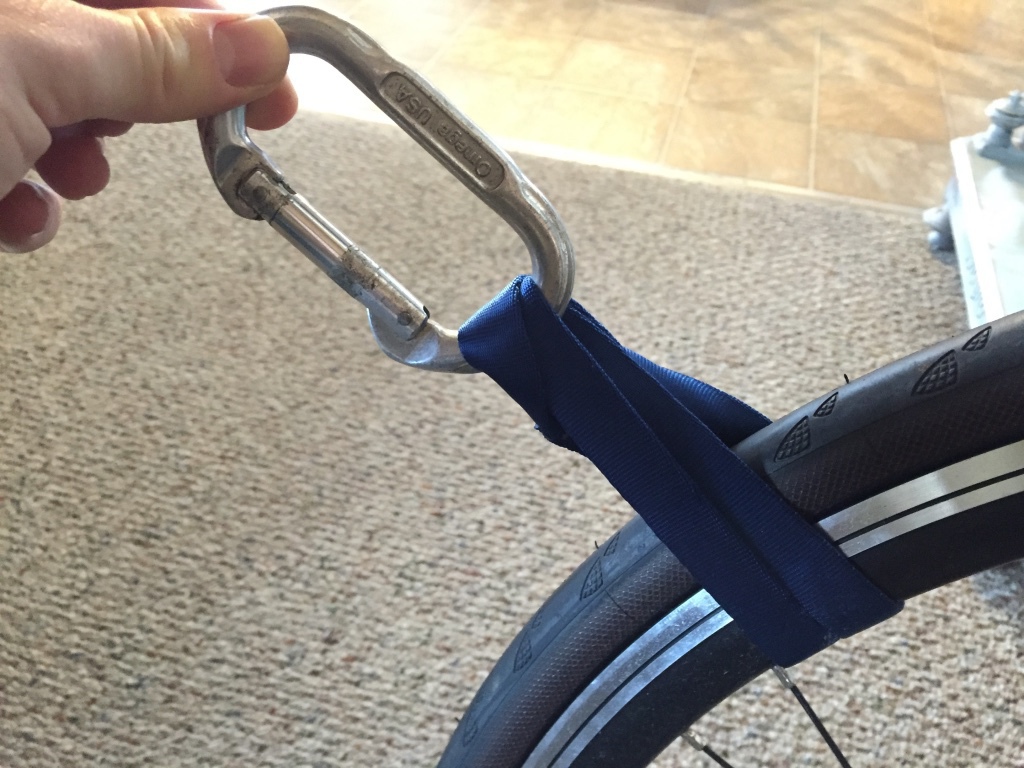
- 2x carabiners. Plain old oval non-locking carabiners work great. I wouldn't use the toy carabiners that come with water bottles and such; if you're trying to save a buck and compromise safety this isn't the project for you.
- 2x 30cm nylon climbing runners. Nylon is soft and won't chew up your bike wheels, which might be carbon or something similarly delicate.
- A few feet of some sturdy cord like paracord for tying the carabiners to the pulleys if the carabiner won't fit through the pulley hole.
- Rope. I used some old climbing rope. How much depends on how high you need to raise the bike, how far apart you place the pulleys, etc. 40' is likely to be enough.
You'll also want some tools:
- Drill and drill bit (I used 1/8" for #14 screws) for predrilling holes for screws
- Measuring tape and a level
- Impact driver or other power screwdriver
- Hammer and punch, nail, awl, or other way of making a small pilot hole so you can predrill without the drill bit "wandering"
- Ladder
- Lighter, heat gun, or other way of melting the ends of cut synthetic rope
Once you have all that, you're ready to begin. First, assemble the part that will actually be hooked to your bike. If your carabiners won't fit through the hole in the pulley, tie them together with some cord. I used paracord with a fisherman's bend. Since we're trying to minimize vertical space, I wrapped the cord around an extra time so that whatever slack I introduced while tying would not enlarge the loop so much. Melt the cut ends of the paracord so they don't fray. Clip a runner through each carabiner.
You'll need to take the wheel out of the ceiling pulleys to be able to mount them, so remove the cotter pin and pull out the axle.
Map out where you want to put your pulleys. Use the tape and level if you're not mounting to a flat ceiling to make sure you're not laying it out crooked. I used a pencil to trace the outline of each of the three holes in the pulley frame while holding it in place, then used a pin punch and hammer to make a mark in the center of my pencil circle. You can then predrill for your screws, using the small indent from the punch/awl/whatever to keep the drill point steady when it starts the hole. Don't forget to predrill for the screw eye too; it might need a different size drill bit.
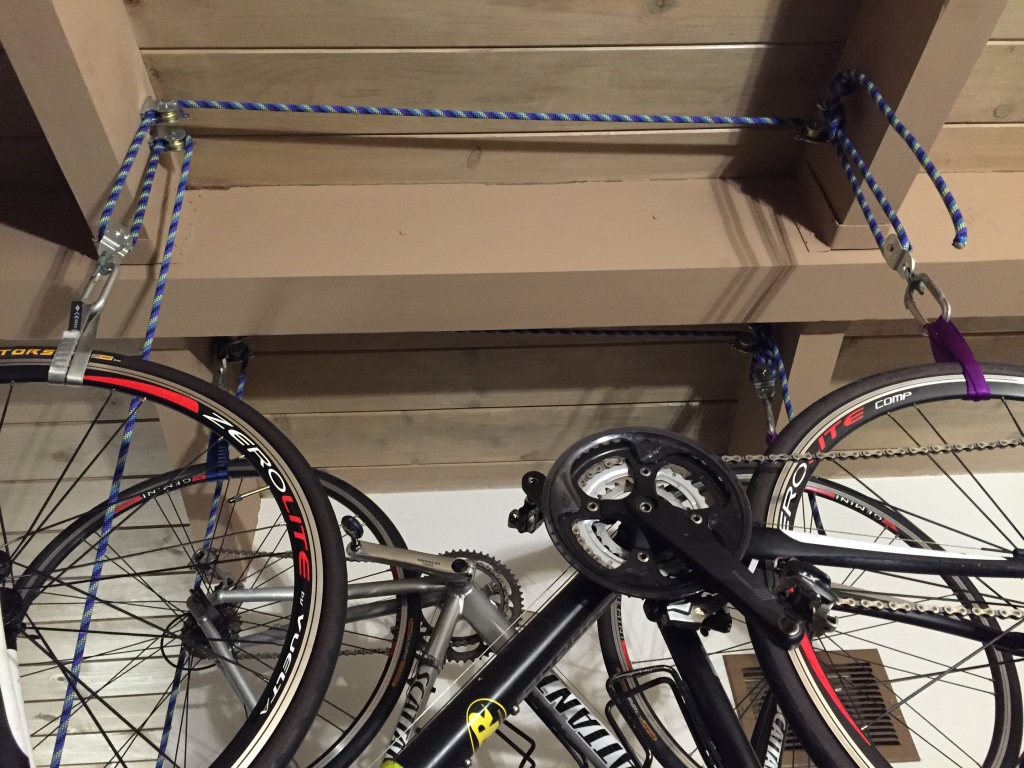
On the side where you'll place the cleat, attach two pulleys with screws. Put the axle, wheel, and cotter pin back in once the frame is screwed on. In my case, the cleat isn't directly below the pulleys, so I've mounted them with the bulkier part of the frame facing the cleat so that when the rope is angled down to the cleat it won't tend to shift off of the pulley.
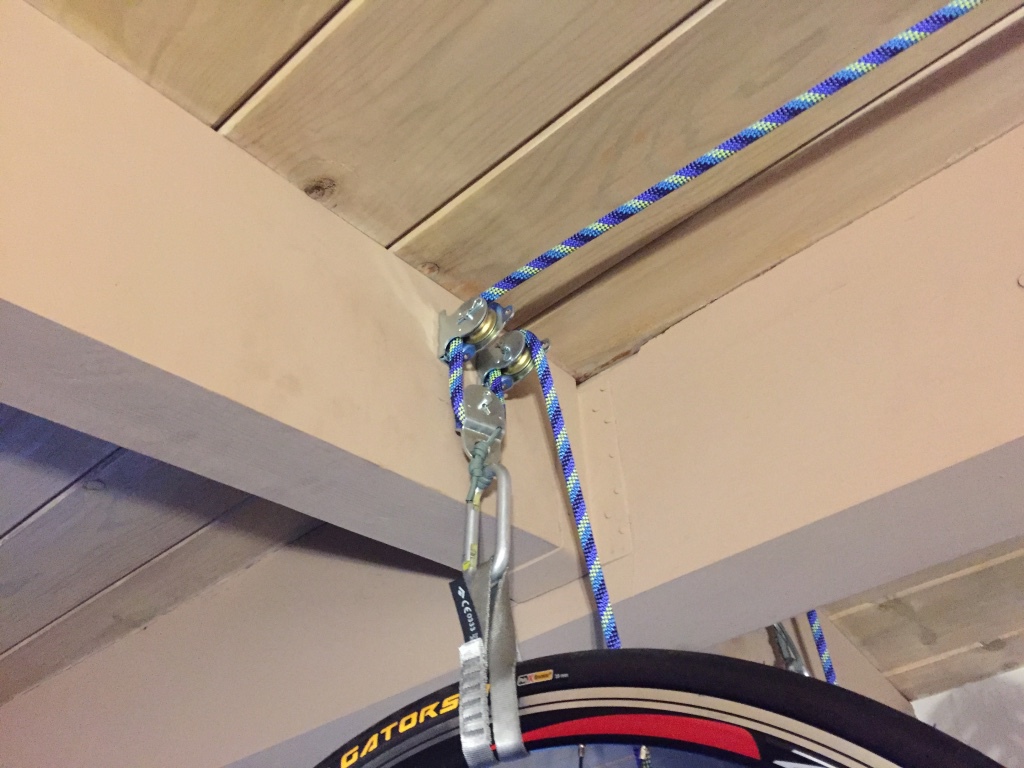
On the other side, mount the remaining pulley and the screw eye. Stick a screwdriver or other strong metal bar through the screw eye and use that to get leverage as you turn it.
As you install the pulleys and the screw eye, loop your rope over each one and pull down hard to make sure it's securely mounted. Make sure to climb off the ladder first before you test!
Pick a place for the cleat to go. Somewhere between waist and head high is probably good, as you'll want to be able to comfortably apply a little force as you work with the rope. Hold the cleat in place, mark with the pencil, and punch two more starter holes. The guys at West Marine told me to put some wood glue on the threads of the screws to help prevent them from backing out. Probably overkill for the light load of 20lbs of bicycle and pulleys, but I had some wood glue anyway so I did that too. Anyway, predrill and then screw in your cleat.
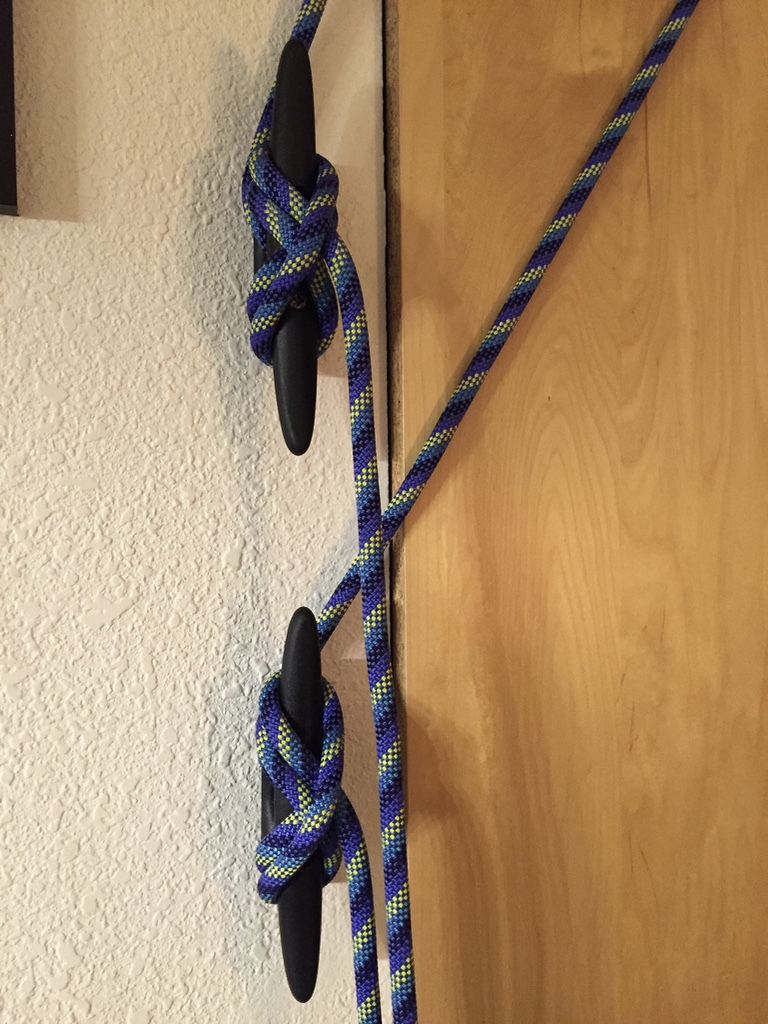
I've got two of these setups, hence the two cleats.
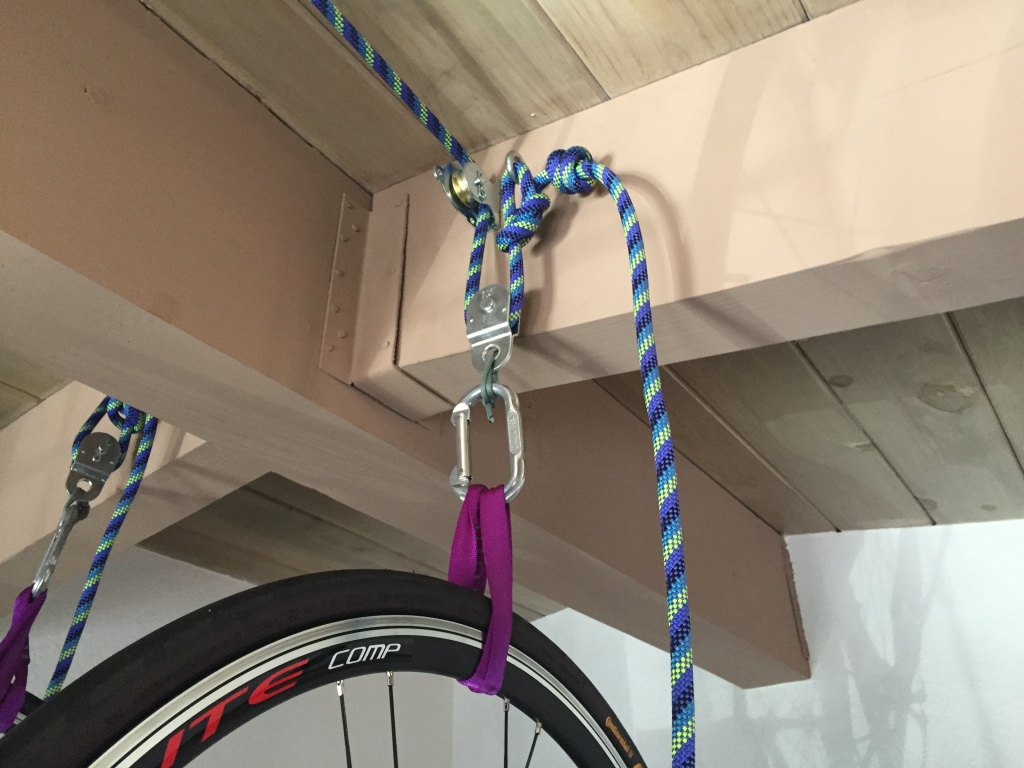
Now you're ready to start assembling the whole thing. Tie off one end of your rope on the screw eye. I first used a figure-8 knot, but then settled on a bowline because it allowed me to get a smaller knot that was closer to the screw eye, allowing me to pull the bike up higher because there was less knot in the way. The bowline, though compact, can slip some when not loaded, so leave a bit of rope on the tail end. I stuck a stopper knot on there too just in case. It's not much of a concern because there will always be at least the pulley's weight keeping the knot a little loaded.
Now that you have something to pull against, uncoil the rest of your rope and let it untwist if it needs to. If your rope still has some twist in it from the way it was stored, it will cause the pairs of rope that go down to the hanging pulleys to twist on themselves.
Work the free end of your rope through a hanging pulley, back up to the mounted pulley next to the screw eye, over the top to a mounted pulley on the other side, down to the second hanging pulley, back up and over the remaining mounted pulley, and down to the cleat. The cleat has a central hole, so run the rope around one of the sides and through that, as this will give you the ability to tie a stopper knot to prevent the rope from coming all the way out of the cleat.
Feed rope into the system so that the pulleys, carabiners, etc are about bike-height. Flip a bike over onto its seat and handlebars, then work the free loop of the runners around the rim and clip the loop into the carabiner.
Pull the rope so that the bike is at the height you want when you load and unload and tie a stopper knot right at the cleat. The bike should now hang by itself against the stopper knot in the cleat hole.
Pull the rope so that the system goes up. You may need to pause and push up one side or another. Because of friction in the pulleys, the end closest to the cleat will probably go up first, but you can simply push up the other end by hand and it will equalize. Once you've got it as high as you want, tie a few figure 8s around the cleat, finishing with one that pinches the free end under the loop (see the picture above of the cleats). Done!