<?xml version="1.0" encoding="utf-8"?><feed xmlns="http://www.w3.org/2005/Atom"><title><![CDATA[/var/blog]]></title><link href="http://varblog.org/atom.xml" rel="self"/><link href="http://varblog.org/"/><updated>2018-05-24T08:13:51-05:00</updated><id>http://varblog.org/</id><author><name><![CDATA[Marshall Pierce]]></name></author><generator uri="http://sysgears.com/grain/">Grain</generator><entry><title type="html"><![CDATA[Profiling and Optimizing Machine Learning Model Training with PyTorch]]></title><link href="http://varblog.org/blog/2018/05/24/profiling-and-optimizing-machine-learning-model-training-with-pytorch/"/><updated>2018-05-24T08:13:51-05:00</updated><id>/blog/2018/05/24/profiling-and-optimizing-machine-learning-model-training-with-pytorch/</id><content type="html"><![CDATA[<p>There's lots of innovation out there building better machine learning models with new neural net structures, regularization methods, etc. Groups like <a href="http://www.fast.ai/">fast.ai</a> are <a href="http://www.fast.ai/2018/04/30/dawnbench-fastai/">training complex models quickly on commodity hardware</a> by relying more on "algorithmic creativity" than on overwhelming hardware power, which is good news for those of us without data centers full of hardware. Rather than add to your stash of creative algorithms, this post takes a different (but compatible) approach to better performance. We'll step through measuring and optimizing model training from a systems perspective, which applies regardless of what algorithm you're using. As we'll see, there are nice speedups to be had with little effort. While keeping the same model structure, hyperparameters, etc, training speed improves by 26% by simply moving some work to another CPU core. You might find that you have easy performance gains waiting for you whether you're using an SVM or a neural network in your project.</p>
<p>We'll be using the <a href="https://github.com/pytorch/examples/tree/master/fast_neural_style">fast neural style</a> example in <a href="https://github.com/pytorch/examples">PyTorch's example projects</a> as the system to optimize. If you just want to see the few code changes needed, check out <a href="https://github.com/pytorch/examples/compare/master...marshallpierce:perf-experiments?expand=1">this branch</a>. Otherwise, to see how to get there step-by-step so that you can replicate this process on your own projects, read on.</p>
<p>If you want to follow along, start by downloading the <a href="http://images.cocodataset.org/zips/train2017.zip">2017 COCO training dataset</a> (18GiB). You'll also need a Linux system with a recent kernel and a GPU (an nVidia one, if you want to use the provided commands as-is). My hardware for this experiment is an i7-6850K with 2x GTX 1070 Ti, though we'll only be using one GPU this time.</p>
<h1>Getting started</h1>
<p>If you're a <code>virtualenv</code> user, you'll probably want to have a virtualenv with the necessary packages installed:</p>
<figure class='code'><div class="highlight"><table><tr><td class="gutter"><pre class="line-numbers"><span class='line-number'>1</span>
<span class='line-number'>2</span>
<span class='line-number'>3</span>
</pre></td><td class='code'><pre><code class='html'><span class='line'><span></span>mkvirtualenv pytorch-examples
</span><span class='line'>workon pytorch-examples
</span><span class='line'>pip install torch torchvision numpy
</span></code></pre></td></tr></table></div></figure>
<p>Clone the <a href="https://github.com/pytorch/examples">pytorch/examples</a> repo and go into the <code>fast_neural_style</code> directory, then start training a model. The batch size is left at the default (4) so it will be easier to replicate these results on smaller hardware, but of course feel free to increase the batch size if you have the hardware. We run <code>date</code> first so we have a timestamp to compare later timestamps with, and pass <code>--cuda 1</code> so that it will use a GPU. The directory to pass to <code>--dataset</code> should be the one <em>containing</em> the <code>train2017</code> directory, not the path to <code>train2017</code> itself.</p>
<figure class='code'><div class="highlight"><table><tr><td class="gutter"><pre class="line-numbers"><span class='line-number'>1</span>
<span class='line-number'>2</span>
<span class='line-number'>3</span>
<span class='line-number'>4</span>
</pre></td><td class='code'><pre><code class='html'><span class='line'><span></span>date ; python neural_style/neural_style.py \
</span><span class='line'>    train --dataset /path/to/coco/ \
</span><span class='line'>     --cuda 1 \
</span><span class='line'>     --save-model-dir model
</span></code></pre></td></tr></table></div></figure>
<p>While that's running for the next few hours, let's dig in to its performance characteristics. <code>vmstat 2</code> isn't fancy, but it's a good place to start. Unsurprisingly, we have negligible <code>wa</code> (i/o wait) CPU usage and little block i/o, and we're seeing normal user CPU usage for one busy process on a 6-core, 12-thread system (10-12%):</p>
<figure class='code'><div class="highlight"><table><tr><td class="gutter"><pre class="line-numbers"><span class='line-number'>1</span>
<span class='line-number'>2</span>
<span class='line-number'>3</span>
<span class='line-number'>4</span>
<span class='line-number'>5</span>
<span class='line-number'>6</span>
<span class='line-number'>7</span>
</pre></td><td class='code'><pre><code class='html'><span class='line'><span></span>procs -----------memory---------- ---swap-- -----io---- -system-- ------cpu-----
</span><span class='line'> r  b   swpd   free   buff  cache   si   so    bi    bo   in   cs us sy id wa st
</span><span class='line'> 2  0      0 978456 1641496 18436400    0    0   298     0 8715 33153 11  3 86  1  0
</span><span class='line'> 1  0      0 977804 1641496 18436136    0    0   256     4 8850 33866 11  3 86  0  0
</span><span class='line'> 3  0      0 966088 1641496 18436136    0    0  1536    12 9793 33106 18  3 79  0  0
</span><span class='line'> 2  0      0 973500 1641496 18436540    0    0   256  2288 9795 36201 12  3 84  1  0
</span><span class='line'> 1  0      0 973576 1641496 18436540    0    0   256     0 8433 32495 10  3 87  0  0
</span></code></pre></td></tr></table></div></figure>
<p>Moving on to the GPU, we'll use <code>nvidia-smi dmon -s u -i 0</code>. <code>dmon</code> periodically outputs GPU info, and we're limiting it to utilization (<code>-s u</code>) and we want the first GPU device (<code>-i 0</code>).</p>
<figure class='code'><div class="highlight"><table><tr><td class="gutter"><pre class="line-numbers"><span class='line-number'>1</span>
<span class='line-number'>2</span>
<span class='line-number'>3</span>
<span class='line-number'>4</span>
<span class='line-number'>5</span>
<span class='line-number'>6</span>
<span class='line-number'>7</span>
<span class='line-number'>8</span>
<span class='line-number'>9</span>
<span class='line-number'>10</span>
</pre></td><td class='code'><pre><code class='html'><span class='line'><span></span># gpu    sm   mem   enc   dec
</span><span class='line'># Idx     %     %     %     %
</span><span class='line'>    0    67    40     0     0
</span><span class='line'>    0    57    35     0     0
</span><span class='line'>    0    69    41     0     0
</span><span class='line'>    0    30    14     0     0
</span><span class='line'>    0    95    52     0     0
</span><span class='line'>    0    65    41     0     0
</span><span class='line'>    0    68    27     0     0
</span><span class='line'>    0    73    34     0     0
</span></code></pre></td></tr></table></div></figure>
<p>Now this is more interesting. GPU utilization as low as 30%? This workload should basically be waiting on the GPU the entire time, so failing to keep the GPU busy is a problem.</p>
<p>To see if there's something seriously wrong, <code>perf stat</code> is a simple way to get a high-level view of what's going on. Just using 100% of a CPU core <a href="https://www.youtube.com/watch?v=QkcBASKLyeU">doesn't mean much</a>; it could be spending all of its time waiting for memory access or pipeline flushes.  We can attach to a running process (that's the <code>-p &lt;pid&gt;</code>) and aggregate performance counters. Note that if you're using a virtual machine, you may not have access to performance counters, and even my physical hardware doesn't support all the counters <code>perf stat</code> looks for, as you can see below.</p>
<figure class='code'><div class="highlight"><table><tr><td class="gutter"><pre class="line-numbers"><span class='line-number'>1</span>
</pre></td><td class='code'><pre><code class='html'><span class='line'><span></span>sudo perf stat -p 15939
</span></code></pre></td></tr></table></div></figure>
<p>After letting that run for a couple of minutes, stopping it with <code>^C</code> prints a summary:</p>
<figure class='code'><div class="highlight"><table><tr><td class="gutter"><pre class="line-numbers"><span class='line-number'>1</span>
<span class='line-number'>2</span>
<span class='line-number'>3</span>
<span class='line-number'>4</span>
<span class='line-number'>5</span>
<span class='line-number'>6</span>
<span class='line-number'>7</span>
<span class='line-number'>8</span>
<span class='line-number'>9</span>
<span class='line-number'>10</span>
<span class='line-number'>11</span>
<span class='line-number'>12</span>
</pre></td><td class='code'><pre><code class='text'><span class='line'><span></span>     167611.675673      task-clock (msec)         #    1.060 CPUs utilized          
</span><span class='line'>            22,843      context-switches          #    0.136 K/sec                  
</span><span class='line'>             1,986      cpu-migrations            #    0.012 K/sec                  
</span><span class='line'>                 7      page-faults               #    0.000 K/sec                  
</span><span class='line'>   641,956,257,119      cycles                    #    3.830 GHz                    
</span><span class='line'>   &lt;not supported&gt;      stalled-cycles-frontend  
</span><span class='line'>   &lt;not supported&gt;      stalled-cycles-backend   
</span><span class='line'>   803,246,123,727      instructions              #    1.25  insns per cycle        
</span><span class='line'>   134,551,532,600      branches                  #  802.758 M/sec                  
</span><span class='line'>       943,869,394      branch-misses             #    0.70% of all branches        
</span><span class='line'>
</span><span class='line'>     158.057364231 seconds time elapsed
</span></code></pre></td></tr></table></div></figure>
<p>Key points:</p>
<ul>
<li>1.25 instructions per cycle isn't awful, but it's not great either. In ideal circumstances, CPUs can retire many instructions per cycle, so if that was more like 3 or 4 then that would be a signal that the CPU was already being kept quite busy.</li>
<li>0.7% branch mispredicts is higher than I'd like, but it isn't catastrophic.</li>
<li>Hundreds of context switches per second is not suitable for realtime systems, but is unlikely to affect batch workloads like this one.</li>
</ul>
<p>Overall, there's nothing obvious like a 5% branch miss rate or 0.5 IPC, so this isn't telling us anything particularly compelling.</p>
<h1>Profiling</h1>
<p>Capturing performance counter information with <code>perf stat</code> shows that there's some room to improve, but it's not providing any details on what to do about it. <code>perf record</code>, on the other hand, samples the program's stack while it's running, so it will tell us more about what specifically the CPU is spending its time doing.</p>
<figure class='code'><div class="highlight"><table><tr><td class="gutter"><pre class="line-numbers"><span class='line-number'>1</span>
</pre></td><td class='code'><pre><code class='text'><span class='line'><span></span>sudo perf record -p 15939
</span></code></pre></td></tr></table></div></figure>
<p>After letting that run for a few minutes, that will have written a <code>perf.data</code> file. It's not human readable, but <code>perf annotate</code> will output disassembly with the percentage of samples where the CPU was executing that instruction. For my run, the <a href="/images/optimizing-machine-learning/annotate-4c0015043a03d94f8b3571ef3ef5979d.txt">output</a> starts with a disassembly of <code>syscall_return_via_sysret</code> indicating that most of the time there is spent on <code>pop</code>. That's not particularly useful knowledge at the moment (the process makes a good number of syscalls, so we do expect to see some time spent there), so let's keep looking. The next item is for <code>jpeg_idct_islow@@LIBJPEG_9.0</code>, part of PIL (Python Imaging Library, aka Pillow). The output starts with a summary like this:</p>
<figure class='code'><div class="highlight"><table><tr><td class="gutter"><pre class="line-numbers"><span class='line-number'>1</span>
<span class='line-number'>2</span>
<span class='line-number'>3</span>
<span class='line-number'>4</span>
<span class='line-number'>5</span>
<span class='line-number'>6</span>
</pre></td><td class='code'><pre><code class='text'><span class='line'><span></span>    2.52 libjpeg-4268453f.so.9.2.0[36635]
</span><span class='line'>    1.93 libjpeg-4268453f.so.9.2.0[3624d]
</span><span class='line'>    1.83 libjpeg-4268453f.so.9.2.0[3646a]
</span><span class='line'>    1.53 libjpeg-4268453f.so.9.2.0[3648b]
</span><span class='line'>    1.44 libjpeg-4268453f.so.9.2.0[36284]
</span><span class='line'>    1.16 libjpeg-4268453f.so.9.2.0[36562]
</span></code></pre></td></tr></table></div></figure>
<p>That continues for about 50 lines or so. That tells us that rather than having a few hot instructions in this function, the cost is smeared out across many instructions (2.52% at offset 36635, 1.93% at 3624d, etc). Paging down to the disassembly, we find lots of this kind of info:</p>
<figure class='code'><div class="highlight"><table><tr><td class="gutter"><pre class="line-numbers"><span class='line-number'>1</span>
<span class='line-number'>2</span>
<span class='line-number'>3</span>
<span class='line-number'>4</span>
<span class='line-number'>5</span>
<span class='line-number'>6</span>
<span class='line-number'>7</span>
<span class='line-number'>8</span>
<span class='line-number'>9</span>
<span class='line-number'>10</span>
<span class='line-number'>11</span>
<span class='line-number'>12</span>
</pre></td><td class='code'><pre><code class='text'><span class='line'><span></span>    0.34 :        35ec0:       cltq   
</span><span class='line'>    0.11 :        35ec2:       mov    %rax,-0x40(%rbp)
</span><span class='line'>    0.14 :        35ec6:       shlq   $0xd,-0x38(%rbp)
</span><span class='line'> libjpeg-4268453f.so.9.2.0[35ecb]    0.72 :       35ecb:       shlq   $0xd,-0x40(%rbp)
</span><span class='line'> libjpeg-4268453f.so.9.2.0[35ed0]    0.82 :       35ed0:       addq   $0x400,-0x38(%rbp)
</span><span class='line'> libjpeg-4268453f.so.9.2.0[35ed8]    0.94 :       35ed8:       mov    -0x40(%rbp),%rax
</span><span class='line'>    0.30 :        35edc:       mov    -0x38(%rbp),%rdx
</span><span class='line'> libjpeg-4268453f.so.9.2.0[35ee0]    0.83 :       35ee0:       add    %rdx,%rax
</span><span class='line'>    0.30 :        35ee3:       mov    %rax,-0x48(%rbp)
</span><span class='line'>    0.28 :        35ee7:       mov    -0x40(%rbp),%rax
</span><span class='line'>    0.00 :        35eeb:       mov    -0x38(%rbp),%rdx
</span><span class='line'>    0.00 :        35eef:       sub    %rax,%rdx
</span></code></pre></td></tr></table></div></figure>
<p>You can see the percentage of samples in the left column (sometimes prefixed with the symbol name for extra busy samples) and offset. This snippet is telling us that 0.72% of cycles were spent on <code>shlq</code> (shift left), 0.82% on <code>addq</code> (integer addition), etc. Note that due to a phenomenon called <a href="https://perf.wiki.kernel.org/index.php/Tutorial">skid</a> the usage per instruction may be incorrect by several or even dozens of instructions, so these percentage numbers should not be taken as gospel. In this case, for instance, it's unlikely that the two <code>shlq</code> instructions at 35ec6 and 35ecb are actually 5x different.</p>
<p>The next section of <code>perf annotate</code> output is of <code>__vdso_clock_gettime@@LINUX_2.6</code>. VDSO is a way to <a href="https://www.linuxjournal.com/content/creating-vdso-colonels-other-chicken">speed up certain syscalls</a>, notably <code>gettimeofday</code>. Not much to see here, other than to note that maybe we shouldn't be calling <code>gettimeofday(2)</code> as much.</p>
<p>The next section is of <code>ImagingResampleHorizontal_8bpc@@Base</code> from <code>_imaging.cpython-35m-x86_64-linux-gnu.so</code>, which has a large block of fairly hot instructions like this:</p>
<figure class='code'><div class="highlight"><table><tr><td class="gutter"><pre class="line-numbers"><span class='line-number'>1</span>
<span class='line-number'>2</span>
<span class='line-number'>3</span>
<span class='line-number'>4</span>
<span class='line-number'>5</span>
</pre></td><td class='code'><pre><code class='text'><span class='line'><span></span> _imaging.cpython-35m-x86_64-linux-gnu.so[21b3b]    3.39 :        21b3b:       imul   %ecx,%esi
</span><span class='line'> _imaging.cpython-35m-x86_64-linux-gnu.so[21b3e]    3.81 :        21b3e:       add    %esi,%r11d
</span><span class='line'> _imaging.cpython-35m-x86_64-linux-gnu.so[21b41]   10.14 :        21b41:       movzbl 0x1(%r8,%rdx,1&gt;
</span><span class='line'> _imaging.cpython-35m-x86_64-linux-gnu.so[21b47]    2.50 :        21b47:       movzbl 0x2(%r8,%rdx,1&gt;
</span><span class='line'> _imaging.cpython-35m-x86_64-linux-gnu.so[21b4d]    3.23 :        21b4d:       imul   %ecx,%esi
</span></code></pre></td></tr></table></div></figure>
<p>That's a pretty hot <code>movzbl</code> (zero-expand 1 byte into 4 bytes). At this point, we have a hypothesis: we're spending a lot of time decoding and scaling images.</p>
<h1>Flame graphs</h1>
<p>To get a clearer view of what paths through the program are the most relevant, we'll use a <a href="http://www.brendangregg.com/flamegraphs.html">flame graph</a>. There are other things we could do with <code>perf</code> like <code>perf report</code>, but flame graphs are easier to understand in my experience. If you haven't worked with flame graphs before, the general idea is that width = percentage of samples and height = call stack. As an example, a tall, skinny column means a deep call stack that doesn't use much CPU time, while a wide, short column means a shallow call stack that uses a lot of CPU.</p>
<p>Clone the <a href="https://github.com/uber/pyflame">Pyflame repo</a> and follow their <a href="https://pyflame.readthedocs.io/en/latest/installation.html#compiling">compile instructions</a>. There's no need to install it anywhere (the <code>make install</code> step) -- just having a compiled <code>pyflame</code> binary in the build output is sufficient.</p>
<p>As with the other tools, we attach the compiled <code>pyflame</code> binary to the running process and let it run for 10 minutes to get good fidelity:</p>
<figure class='code'><div class="highlight"><table><tr><td class="gutter"><pre class="line-numbers"><span class='line-number'>1</span>
</pre></td><td class='code'><pre><code class='text'><span class='line'><span></span>./src/pyflame -s 600 -p 15939 -o neural-style-baseline.pyflame
</span></code></pre></td></tr></table></div></figure>
<p>In the meantime, clone <a href="https://github.com/brendangregg/FlameGraph">FlameGraph</a> so we can render <code>pyflame</code>'s output as an SVG. From the FlameGraph repo:</p>
<figure class='code'><div class="highlight"><table><tr><td class="gutter"><pre class="line-numbers"><span class='line-number'>1</span>
</pre></td><td class='code'><pre><code class='text'><span class='line'><span></span>./flamegraph.pl path/to/neural-style-baseline.pyflame &gt; neural-style-baseline.svg
</span></code></pre></td></tr></table></div></figure>
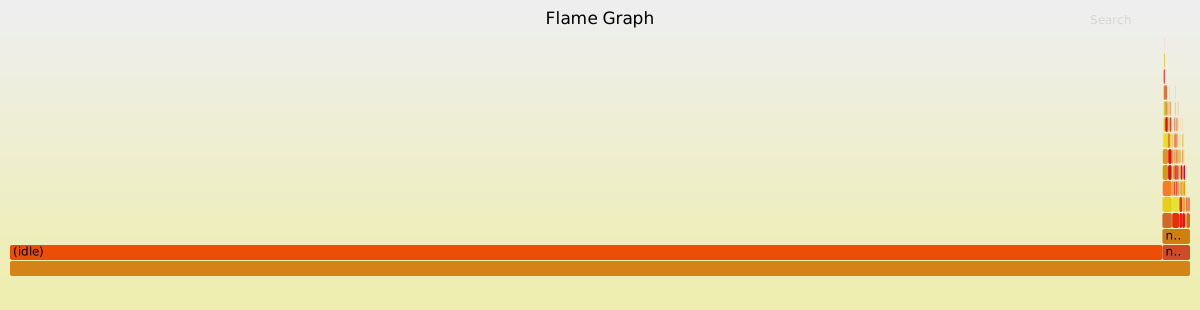
<p>The resulting flamegraph looks like this, which you'll probably want to open in a separate tab and zoom in on (the SVG has helpful mouseover info):</p>
<p><a href="/images/optimizing-machine-learning/neural-style-baseline-16da7db5473d84e617712dd3ea7c9c53.svg">
<img class='centered' src="/images/optimizing-machine-learning/neural-style-baseline-16da7db5473d84e617712dd3ea7c9c53.svg" />
</a></p>
<p>Most of the time is <a href="https://pyflame.readthedocs.io/en/latest/faq.html#what-is-idle-time">idle</a>, which isn't interesting in this case. Back to pyflame, this time with <code>-x</code> to exclude idle time:</p>
<figure class='code'><div class="highlight"><table><tr><td class="gutter"><pre class="line-numbers"><span class='line-number'>1</span>
</pre></td><td class='code'><pre><code class='text'><span class='line'><span></span>./src/pyflame -s 600 -p 15939 -x -o neural-style-baseline-noidle.pyflame
</span></code></pre></td></tr></table></div></figure>
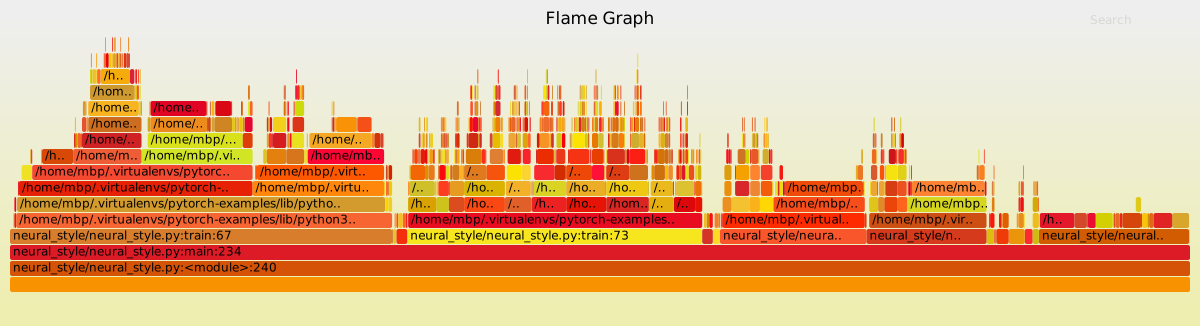
<p><a href="/images/optimizing-machine-learning/neural-style-baseline-noidle-dfa537d33d887f8b2a759b788506e885.svg">
<img class='centered' src="/images/optimizing-machine-learning/neural-style-baseline-noidle-dfa537d33d887f8b2a759b788506e885.svg" />
</a></p>
<p>That's much easier to see. If you spend some time mousing around the left third or so of the graph, you'll find that a significant amount of execution time is spent on image decoding and manipulation, starting with <code>neural_style.py:67</code>, which is this:</p>
<figure class='code'><div class="highlight"><table><tr><td class="gutter"><pre class="line-numbers"><span class='line-number'>1</span>
</pre></td><td class='code'><pre><code class='python'><span class='line'><span></span><span class="k">for</span> <span class="n">batch_id</span><span class="p">,</span> <span class="p">(</span><span class="n">x</span><span class="p">,</span> <span class="n">_</span><span class="p">)</span> <span class="ow">in</span> <span class="nb">enumerate</span><span class="p">(</span><span class="n">train_loader</span><span class="p">):</span>
</span></code></pre></td></tr></table></div></figure>
<p>Put another way, it's spending enough time decoding images that it's a significant part of the overall execution, and it's all clumped together in one place rather than being spread across the whole program. In a way, that's good news, because that's a problem we can pretty easily do something about. There's still the other 2/3rds of the graph that we'd love to optimize away too, but that's mostly running the PyTorch model, and improving that will require much more surgery. There is a surprising amount of time spent in <code>vgg.py</code>'s usage of <code>namedtuple</code>, though -- that might be a good thing to investigate another  time. So, let's work on that first third of the graph: loading the training data.</p>
<h1>Adding some parallelism</h1>
<p>By now that <code>python</code> command has probably been running for a good long while. It helpfully outputs timestamps every 2000 iterations, and comparing the 20,000 iteration timestamp with the start timestamp I get 21m 40s elapsed. We'll use this duration later.</p>
<p>It's unlikely that we'll make huge strides in JPEG decoding, as that code is already written in a low level language and reasonably well optimized. What we can do, though, is move the CPU-intensive work of image decoding onto another core. Normally this would be a good place to use threads, but Python as a language and CPython as a runtime are not very well suited to multithreading. We can use another <code>Process</code> to avoid the GIL (Global Interpreter Lock) and lack of memory model, though, and even though we'll have more overhead between processes than we would between threads, it should still be a net win. Conveniently, the work we want to execute concurrently is already small and fairly isolated, so it should be easy to move to another process. The training data <code>DataLoader</code> is set up in <code>neural_style.py</code> with</p>
<figure class='code'><div class="highlight"><table><tr><td class="gutter"><pre class="line-numbers"><span class='line-number'>1</span>
<span class='line-number'>2</span>
</pre></td><td class='code'><pre><code class='python'><span class='line'><span></span><span class="n">train_dataset</span> <span class="o">=</span> <span class="n">datasets</span><span class="o">.</span><span class="n">ImageFolder</span><span class="p">(</span><span class="n">args</span><span class="o">.</span><span class="n">dataset</span><span class="p">,</span> <span class="n">transform</span><span class="p">)</span>
</span><span class='line'><span class="n">train_loader</span> <span class="o">=</span> <span class="n">DataLoader</span><span class="p">(</span><span class="n">train_dataset</span><span class="p">,</span> <span class="n">batch_size</span><span class="o">=</span><span class="n">args</span><span class="o">.</span><span class="n">batch_size</span><span class="p">)</span>
</span></code></pre></td></tr></table></div></figure>
<p>and used with</p>
<figure class='code'><div class="highlight"><table><tr><td class="gutter"><pre class="line-numbers"><span class='line-number'>1</span>
</pre></td><td class='code'><pre><code class='python'><span class='line'><span></span><span class="k">for</span> <span class="n">batch_id</span><span class="p">,</span> <span class="p">(</span><span class="n">x</span><span class="p">,</span> <span class="n">_</span><span class="p">)</span> <span class="ow">in</span> <span class="nb">enumerate</span><span class="p">(</span><span class="n">train_loader</span><span class="p">):</span>
</span></code></pre></td></tr></table></div></figure>
<p>So, all we need to do is move the loading to another process. We can do this with a <a href="https://docs.python.org/3/library/multiprocessing.html#multiprocessing.Queue">Queue</a> (actually, one of <a href="https://pytorch.org/docs/stable/notes/multiprocessing.html">PyTorch's wrappers</a>). Instead of enumerating <code>train_loader</code> in the main process, we'll have another process do that so that all the image decoding can happen on another core, and we'll receive the decoded data in the main process. To make it easy to enumerate a <code>Queue</code>, we'll start with a helper to make a <code>Queue</code> be iterable:</p>
<figure class='code'><div class="highlight"><table><tr><td class="gutter"><pre class="line-numbers"><span class='line-number'>1</span>
<span class='line-number'>2</span>
<span class='line-number'>3</span>
<span class='line-number'>4</span>
<span class='line-number'>5</span>
<span class='line-number'>6</span>
<span class='line-number'>7</span>
<span class='line-number'>8</span>
<span class='line-number'>9</span>
<span class='line-number'>10</span>
<span class='line-number'>11</span>
<span class='line-number'>12</span>
<span class='line-number'>13</span>
<span class='line-number'>14</span>
<span class='line-number'>15</span>
<span class='line-number'>16</span>
<span class='line-number'>17</span>
</pre></td><td class='code'><pre><code class='python'><span class='line'><span></span><span class="k">class</span> <span class="nc">QueueIterator</span><span class="p">:</span>
</span><span class='line'>    <span class="sd">&quot;&quot;&quot;</span>
</span><span class='line'><span class="sd">    An Iterator over a Queue&#39;s contents that stops when it receives a None</span>
</span><span class='line'><span class="sd">    &quot;&quot;&quot;</span>
</span><span class='line'>    <span class="k">def</span> <span class="fm">__init__</span><span class="p">(</span><span class="bp">self</span><span class="p">,</span> <span class="n">q</span><span class="p">:</span> <span class="n">Queue</span><span class="p">):</span>
</span><span class='line'>        <span class="bp">self</span><span class="o">.</span><span class="n">q</span> <span class="o">=</span> <span class="n">q</span>
</span><span class='line'>
</span><span class='line'>    <span class="k">def</span> <span class="fm">__iter__</span><span class="p">(</span><span class="bp">self</span><span class="p">):</span>
</span><span class='line'>        <span class="k">return</span> <span class="bp">self</span>
</span><span class='line'>
</span><span class='line'>    <span class="k">def</span> <span class="nf">__next__</span><span class="p">(</span><span class="bp">self</span><span class="p">):</span>
</span><span class='line'>        <span class="n">thing</span> <span class="o">=</span> <span class="bp">self</span><span class="o">.</span><span class="n">q</span><span class="o">.</span><span class="n">get</span><span class="p">()</span>
</span><span class='line'>
</span><span class='line'>        <span class="k">if</span> <span class="n">thing</span> <span class="ow">is</span> <span class="bp">None</span><span class="p">:</span>
</span><span class='line'>            <span class="k">raise</span> <span class="ne">StopIteration</span><span class="p">()</span>
</span><span class='line'>
</span><span class='line'>        <span class="k">return</span> <span class="n">thing</span>
</span></code></pre></td></tr></table></div></figure>
<p>We're making the simple assumption that if we pop <code>None</code> off the queue, the iteration is complete. Next, we need a function to invoke in another process that will populate the queue. This is made a bit more complicated by the fact that we can't spawn a process at the intuitive point in the training <code>for</code> loop. If we create a new <code>Process</code> where we enumerate over <code>train_loader</code> (as in the code snippet above), the child process hangs immediately and never is able to populate the queue. The PyTorch docs warn that <a href="https://pytorch.org/docs/stable/notes/multiprocessing.html#avoiding-and-fighting-deadlocks">about such issues</a>, but unfortunately using <code>torch.multiprocessing</code>'s wrappers or <code>SimpleQueue</code> did not help. Getting to the root cause of that problem will be a task for another day, but it's simple enough to rearrange the code to avoid the problem: fork a worker process earlier, and re-use it across multiple iterations. To do this, we use <em>another</em> <code>Queue</code> as a simple communication mechanism, which is <code>control_queue</code> below. The usage is pretty basic: sending <code>True</code> through <code>control_queue</code> tells the worker to enumerate the loader and populate <code>batch_queue</code>, finishing with a <code>None</code> to signal completion to the <code>QueueIterator</code> on the other end, while sending <code>False</code> tells the worker that its job is done and it can end its loop (and therefore exit).</p>
<figure class='code'><div class="highlight"><table><tr><td class="gutter"><pre class="line-numbers"><span class='line-number'>1</span>
<span class='line-number'>2</span>
<span class='line-number'>3</span>
<span class='line-number'>4</span>
<span class='line-number'>5</span>
<span class='line-number'>6</span>
<span class='line-number'>7</span>
<span class='line-number'>8</span>
<span class='line-number'>9</span>
</pre></td><td class='code'><pre><code class='python'><span class='line'><span></span><span class="k">def</span> <span class="nf">enqueue_loader_output</span><span class="p">(</span><span class="n">batch_queue</span><span class="p">:</span> <span class="n">Queue</span><span class="p">,</span> <span class="n">control_queue</span><span class="p">:</span> <span class="n">Queue</span><span class="p">,</span> <span class="n">loader</span><span class="p">):</span>
</span><span class='line'>    <span class="k">while</span> <span class="bp">True</span><span class="p">:</span>
</span><span class='line'>        <span class="n">ctrl</span> <span class="o">=</span> <span class="n">control_queue</span><span class="o">.</span><span class="n">get</span><span class="p">()</span>
</span><span class='line'>        <span class="k">if</span> <span class="n">ctrl</span> <span class="ow">is</span> <span class="bp">False</span><span class="p">:</span>
</span><span class='line'>            <span class="k">break</span>
</span><span class='line'>        
</span><span class='line'>        <span class="k">for</span> <span class="n">batch_id</span><span class="p">,</span> <span class="p">(</span><span class="n">x</span><span class="p">,</span> <span class="n">_</span><span class="p">)</span> <span class="ow">in</span> <span class="nb">enumerate</span><span class="p">(</span><span class="n">loader</span><span class="p">):</span>
</span><span class='line'>            <span class="n">batch_queue</span><span class="o">.</span><span class="n">put</span><span class="p">((</span><span class="n">batch_id</span><span class="p">,</span> <span class="n">x</span><span class="p">))</span>
</span><span class='line'>        <span class="n">batch_queue</span><span class="o">.</span><span class="n">put</span><span class="p">(</span><span class="bp">None</span><span class="p">)</span>
</span></code></pre></td></tr></table></div></figure>
<p>Now we have everything we need to wire it all together. Before the training loop, make some queues and fork a process:</p>
<figure class='code'><div class="highlight"><table><tr><td class="gutter"><pre class="line-numbers"><span class='line-number'>1</span>
<span class='line-number'>2</span>
<span class='line-number'>3</span>
</pre></td><td class='code'><pre><code class='python'><span class='line'><span></span><span class="n">batch_queue</span> <span class="o">=</span> <span class="n">Queue</span><span class="p">(</span><span class="mi">100</span><span class="p">)</span>
</span><span class='line'><span class="n">control_queue</span> <span class="o">=</span> <span class="n">Queue</span><span class="p">()</span>
</span><span class='line'><span class="n">Process</span><span class="p">(</span><span class="n">target</span><span class="o">=</span><span class="n">enqueue_loader_output</span><span class="p">,</span> <span class="n">args</span><span class="o">=</span><span class="p">(</span><span class="n">batch_queue</span><span class="p">,</span> <span class="n">control_queue</span><span class="p">,</span> <span class="n">train_loader</span><span class="p">))</span><span class="o">.</span><span class="n">start</span><span class="p">()</span>
</span></code></pre></td></tr></table></div></figure>
<p>And then iterate in the training loop with a <code>QueueIterator</code>:</p>
<figure class='code'><div class="highlight"><table><tr><td class="gutter"><pre class="line-numbers"><span class='line-number'>1</span>
</pre></td><td class='code'><pre><code class='python'><span class='line'><span></span><span class="k">for</span> <span class="n">batch_id</span><span class="p">,</span> <span class="n">x</span> <span class="ow">in</span> <span class="n">QueueIterator</span><span class="p">(</span><span class="n">batch_queue</span><span class="p">):</span>
</span></code></pre></td></tr></table></div></figure>
<h1>Measuring</h1>
<p>After stopping the previous training invocation and starting a new one, we can immediately see a good change in <code>nvidia-smi dmon</code>:</p>
<figure class='code'><div class="highlight"><table><tr><td class="gutter"><pre class="line-numbers"><span class='line-number'>1</span>
<span class='line-number'>2</span>
<span class='line-number'>3</span>
<span class='line-number'>4</span>
<span class='line-number'>5</span>
<span class='line-number'>6</span>
<span class='line-number'>7</span>
<span class='line-number'>8</span>
<span class='line-number'>9</span>
<span class='line-number'>10</span>
<span class='line-number'>11</span>
<span class='line-number'>12</span>
<span class='line-number'>13</span>
</pre></td><td class='code'><pre><code class='python'><span class='line'><span></span><span class="c1"># gpu    sm   mem   enc   dec</span>
</span><span class='line'><span class="c1"># Idx     %     %     %     %</span>
</span><span class='line'>    <span class="mi">0</span>    <span class="mi">97</span>    <span class="mi">44</span>     <span class="mi">0</span>     <span class="mi">0</span>
</span><span class='line'>    <span class="mi">0</span>    <span class="mi">97</span>    <span class="mi">45</span>     <span class="mi">0</span>     <span class="mi">0</span>
</span><span class='line'>    <span class="mi">0</span>    <span class="mi">99</span>    <span class="mi">50</span>     <span class="mi">0</span>     <span class="mi">0</span>
</span><span class='line'>    <span class="mi">0</span>    <span class="mi">97</span>    <span class="mi">49</span>     <span class="mi">0</span>     <span class="mi">0</span>
</span><span class='line'>    <span class="mi">0</span>    <span class="mi">97</span>    <span class="mi">47</span>     <span class="mi">0</span>     <span class="mi">0</span>
</span><span class='line'>    <span class="mi">0</span>    <span class="mi">97</span>    <span class="mi">48</span>     <span class="mi">0</span>     <span class="mi">0</span>
</span><span class='line'>    <span class="mi">0</span>    <span class="mi">99</span>    <span class="mi">50</span>     <span class="mi">0</span>     <span class="mi">0</span>
</span><span class='line'>    <span class="mi">0</span>    <span class="mi">97</span>    <span class="mi">55</span>     <span class="mi">0</span>     <span class="mi">0</span>
</span><span class='line'>    <span class="mi">0</span>    <span class="mi">97</span>    <span class="mi">56</span>     <span class="mi">0</span>     <span class="mi">0</span>
</span></code></pre></td></tr></table></div></figure>
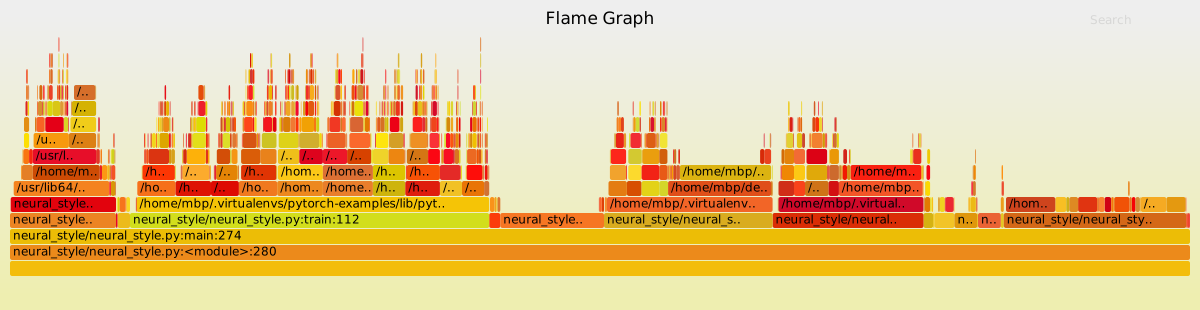
<p>The GPU is staying fully utilized. Here's the master process:</p>
<p><a href="/images/optimizing-machine-learning/neural-style-tmpq-master-6b9ce81e14b2fd083fafca6be8ba5092.svg">
<img class='centered' src="/images/optimizing-machine-learning/neural-style-tmpq-master-6b9ce81e14b2fd083fafca6be8ba5092.svg" />
</a></p>
<p>What was previously the largest chunk of work in the flame graph is now the small peak on the left. Training logic dominates the graph, instead of image decoding, and <code>namedtuple</code> looks like increasingly low-hanging fruit at 13% of samples...</p>
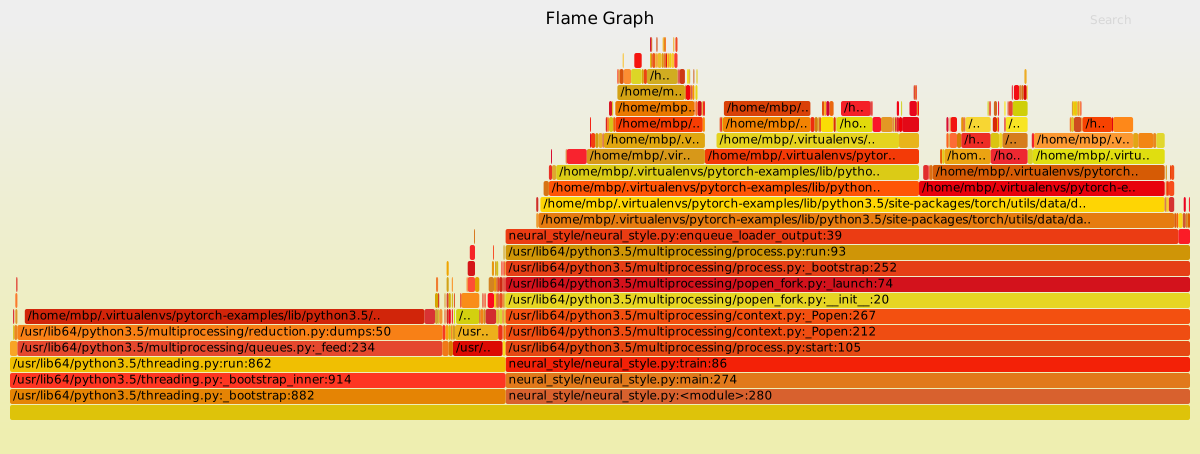
<p>And the worker that loads training images:</p>
<p><a href="/images/optimizing-machine-learning/neural-style-tmpq-worker-56fb5021334a67c43c1d257f2bbe1957.svg">
<img class='centered' src="/images/optimizing-machine-learning/neural-style-tmpq-worker-56fb5021334a67c43c1d257f2bbe1957.svg" />
</a></p>
<p>It's spending most of its time doing image decoding. There's some CPU spent in Python's Queue implementation, but the worker sits at about 40% CPU usage total anyway, so the inter-process communication isn't a major bottleneck in this case.</p>
<p>More importantly, for our "time until 20,000 iterations" measurement, that improves from 21m40s to 17m9s, or about a 26% improvement in iterations/sec (15.4 to 19.4). Not bad for just a few lines of straightforward code.</p>
]]></content></entry><entry><title type="html"><![CDATA[Rust and WebAssembly with Turtle]]></title><link href="http://varblog.org/blog/2018/01/08/rust-and-webassembly-with-turtle/"/><updated>2018-01-08T12:09:42-06:00</updated><id>/blog/2018/01/08/rust-and-webassembly-with-turtle/</id><content type="html"><![CDATA[<p>In this post, I'll walk through a few of the highlights of getting <a href="http://turtle.rs/">Turtle</a>, a Rust library for creating animated drawings, to run in the browser with WebAssembly.</p>
<p>Rust has <a href="https://github.com/rust-lang/rust/pull/46115">recently</a> gained built-in support for compiling to <a href="http://webassembly.org/">WebAssembly</a>.
While it's currently considered experimental and has some rough edges, it's not too early to <a href="https://www.hellorust.com/">start seeing what it can do with some demos</a>. After an
<a href="https://bitbucket.org/marshallpierce/rust-wasm-base64">experiment running rust-base64 via WebAssembly</a> with surprisingly good performance, I saw <a href="https://twitter.com/gcouprie/status/938842985906700288">this tweet</a> suggesting that someone port Turtle to run in the browser, and figured I'd give it a try <a href="https://github.com/sunjay/turtle/pull/53">(see PR)</a>. Turtle is a more interesting port than rust-base64's low level functionality: it's larger, and has dependencies on concepts that have no clear web analog, like forking processes and desktop windows. You can run it yourself with any recent browser; just follow <a href="https://github.com/sunjay/turtle/pull/53/files#diff-e3d3691703168e79428c9bd1c084f5bc">these instructions</a>.</p>
<h2>Why Rust + WebAssembly?</h2>
<p>See the <a href="http://webassembly.org/">official WebAssembly site</a> for more detail, but in essence WebAssembly is an escape hatch from
the misery of JavaScript as the sole language runtime available in browsers. Even though it's already possible to
transpile to JavaScript with tools like emscripten or languages like TypeScript, that doesn't solve problems like
JavaScript's lack of proper numeric types. WebAssembly provides a much better target for web-deployed code than
JavaScript: it's compact, fast to parse, and JIT compiler friendly.</p>
<p>WebAssembly is not competition for JavaScript directly. It's more akin to JVM bytecode. This makes it a great fit for Rust, though, which has a minimal runtime and no garbage collector.</p>
<h2>Turtle</h2>
<p>Turtle is a library for making little single-purpose applications that draw graphics ala the
<a href="https://en.wikipedia.org/wiki/Logo_%28programming_language%29">Logo</a> language. See below for a simple program (the
<a href="https://github.com/sunjay/turtle/blob/5db76f7d12baa6676f84088432e1896c42da80c6/examples/snowflake.rs"><code>snowflake</code></a>
example in the Turtle repo) that's most of the way through its drawing logic.</p>
<p><img class='centered' src="/images/turtle/koch-snowflake-d35530a36ba6f0eb6cb7c5f183c0b609.png" /></p>
<h3>Turtle's existing architecture</h3>
<p>Turtle is designed to be friendly to beginner programmers, so unlike most graphics-related code, it's not based around
the concept of an explicit render loop. Instead, Turtle programs simply take over the main thread and run straightforward-looking
code like this (which draws a circle):</p>
<figure class='code'><div class="highlight"><table><tr><td class="gutter"><pre class="line-numbers"><span class='line-number'>1</span>
<span class='line-number'>2</span>
<span class='line-number'>3</span>
<span class='line-number'>4</span>
<span class='line-number'>5</span>
<span class='line-number'>6</span>
</pre></td><td class='code'><pre><code class='rust'><span class='line'><span></span><span class="k">for</span><span class="w"> </span><span class="n">_</span><span class="w"> </span><span class="k">in</span><span class="w"> </span><span class="mi">0</span><span class="p">..</span><span class="mi">360</span><span class="w"> </span><span class="p">{</span><span class="w"></span>
</span><span class='line'><span class="w">    </span><span class="c1">// Move forward three steps</span>
</span><span class='line'><span class="w">    </span><span class="n">turtle</span><span class="p">.</span><span class="n">forward</span><span class="p">(</span><span class="mf">3.0</span><span class="p">);</span><span class="w"></span>
</span><span class='line'><span class="w">    </span><span class="c1">// Rotate to the right (clockwise) by 1 degree</span>
</span><span class='line'><span class="w">    </span><span class="n">turtle</span><span class="p">.</span><span class="n">right</span><span class="p">(</span><span class="mf">1.0</span><span class="p">);</span><span class="w"></span>
</span><span class='line'><span class="p">}</span><span class="w"></span>
</span></code></pre></td></tr></table></div></figure>
<p>The small pauses needed for animation are implicit, and programmers can use local variables in a natural way to manage state. This has some implications for running in the browser, as we'll see.</p>
<h2>Compiling to <code>wasm32</code></h2>
<p>As with any wasm project, the first step is to get the toolchain:</p>
<figure class='code'><div class="highlight"><table><tr><td class="gutter"><pre class="line-numbers"><span class='line-number'>1</span>
<span class='line-number'>2</span>
</pre></td><td class='code'><pre><code class='sh'><span class='line'><span></span>rustup update
</span><span class='line'>rustup target add wasm32-unknown-unknown --toolchain nightly
</span></code></pre></td></tr></table></div></figure>
<p>Hypothetically, this would be all that's needed to compile the example turtle programs:</p>
<figure class='code'><div class="highlight"><table><tr><td class="gutter"><pre class="line-numbers"><span class='line-number'>1</span>
</pre></td><td class='code'><pre><code class='sh'><span class='line'><span></span>cargo +nightly build --target<span class="o">=</span>wasm32-unknown-unknown --examples
</span></code></pre></td></tr></table></div></figure>
<p>However, there were naturally some dependencies that didn't play nice with the wasm32 target, mainly involving <a href="https://github.com/pistondevelopers/piston">Piston</a>, the graphics library used internally. Fortunately, Piston's various crates are nicely broken down to separate the platform-specific parts from platform-agnostic things like math helper functions, so introducing a <code>canvas</code> feature to control Piston dependencies (among other things) was all that was needed. That brings us to:</p>
<figure class='code'><div class="highlight"><table><tr><td class="gutter"><pre class="line-numbers"><span class='line-number'>1</span>
</pre></td><td class='code'><pre><code class='sh'><span class='line'><span></span>cargo +nightly build --no-default-features --features<span class="o">=</span>canvas --target<span class="o">=</span>wasm32-unknown-unknown --release --examples
</span></code></pre></td></tr></table></div></figure>
<h2>Control flow</h2>
<p>The current architecture of a Turtle program running on a desktop uses two processes: one to run the user's logic, and
another to handle rendering. When the program starts, it first forks a render process, then passes control flow to the
user's logic in the parent process. When code like <code>turtle.forward()</code> runs, that ends up passing drawing commands (and
other communication) via stdin/stdout to the child rendering process, which uses those to draw into a
<a href="https://github.com/pistondevelopers/piston">Piston</a> window. The two-process model allows graphics rendering to be done
by the main thread (which is required on macOS) while still allowing users to simply write a <code>main()</code> function and not
worry about how to run their code in another thread.</p>
<p>Turtle code doesn't let go of control flow until the drawing has completed. This isn't a problem when Turtle code is running in one process and feeding commands to another process to be rendered to the screen, but browser-resident animation <em>really</em> wants to run code that runs a little bit at a time in an event loop via <a href="https://developer.mozilla.org/en-US/docs/Web/API/window/requestAnimationFrame"><code>requestAnimationFrame()</code></a>. The browser doesn't update the page until control flow for your code has exited. This has some upsides for browsers (no concerns about thread safety when all code is time-sliced into one thread, for instance), but it in Turtle's case, it means that running in the main thread would update the screen exactly once: when the drawing was complete.</p>
<p>We do have one trick up our sleeve, though: <a href="https://developer.mozilla.org/en-US/docs/Web/API/Web_Workers_API">Web Workers</a>. These allow simple parallelism, but there is no good way to share memory with a worker and the main thread. (Aha, you say! What about <a href="https://developer.mozilla.org/en-US/docs/Web/JavaScript/Reference/Global_Objects/SharedArrayBuffer">SharedArrayBuffer</a>? Nope, it's been disabled due to <a href="https://spectreattack.com/">Spectre</a>.) What we <em>can</em> do, though, is send messages to the main thread with <a href="https://developer.mozilla.org/en-US/docs/Web/API/Window/postMessage"><code>postMessage()</code></a>. This way, we can create a worker for Turtle, let it take over that thread entirely, and periodically post messages to be sent to the main thread when it wants to update the UI.</p>
<h2>Drawing pixels</h2>
<p>Let's consider a very simple Turtle program where the user wishes to draw a line. This boils down to <code>turtle.forward(10)</code> or equivalent. However, this isn't going to get all 10 pixels drawn all at once, because the turtle has a speed. So, it will calculate how long it should take to draw 10 pixels, and draw intermediate versions as time goes on. The same applies when drawing a polygon with a fill: the fill is partially applied at each point in the animation as the edges of the polygon are drawn. As parts of the drawing accumulate over time as the animation continues, the <code>Renderer</code> keeps track of all of them and re-draws them with its Piston <code>Graphics</code> backend every frame.</p>
<p>Naturally, the existing graphics stack that uses <code>piston_window</code> to draw graphics into a desktop app's window isn't going to seamlessly just start running in the browser and render into a <code>&lt;canvas&gt;</code>. So, where should the line be drawn about what is desktop-specific (and will therefore have to be reimplemented for the web)?</p>
<p>One option would be to reimplement the high level turtle interface (<code>forward()</code>, etc) in terms of Canvas drawing calls like <a href="https://developer.mozilla.org/en-US/docs/Web/API/CanvasRenderingContext2D/beginPath"><code>beginPath()</code></a>. While it certainly can be done, it would require reimplementing a lot of code that animates, manages partially-completed polygons, draws the turtle itself, etc. The messages sent to the main thread would likely be a a JS array of closures which, when executed in the appropriate context, would update the <code>&lt;canvas&gt;</code> in the web page. Alternately, the canvas commands to run could be expressed as Objects with various fields, etc. This saves us from worrying about low level pixel wrangling, but at the cost of creating two parallel implementations of some nontrivial logic, one of which is quite difficult to test or reason about in isolation. It also means that as the drawing gets more complex over time, the list of commands to run grows as well, so performance will decay over time. It also involves many small allocations (and consequently more load on the JS GC).</p>
<p>Another approach would be to implement the Piston <code>Graphics</code> trait in terms of the Canvas API. This entails a lot less code duplication because things like animation, drawing the turtle "head" triangle, etc can all be re-used, but it still suffers from the performance decay over time, and has a fair amount of logic that needs to be built in JS, which I was trying to avoid. It's definitely much more practical than the previous option, though.</p>
<p>The approach I chose was to implement <code>Graphics</code> to write to an RGBA pixel buffer, which is easy to then display with a <code>&lt;canvas&gt;</code>. This has a minimal amount of JS needed, and has heavy, but consistent, allocation and message passing cost. Each frame requires one (large) allocation to copy the entire pixel buffer, which is then sent to the main thread and used to update the <code>&lt;canvas&gt;</code>. Obviously there are various ways to optimize this (only sending changed sub-sequences of pixels, etc) but for a first step, sending the entire buffer was functional and reliable. For Turtle's needs, <code>Graphics</code> only needs to draw triangles with a solid fill, which is pretty straightforward.</p>
<h2>Passing control flow to Turtle</h2>
<p>Getting from <code>main()</code> to Turtle logic is actually a little complicated even when running on a desktop, as mentioned above. It is undesirable to have users deal with running turtle code in a different thread, so instead while Turtle is initializing it does its best to fork at the right time. If users are doing nontrivial initialization code of their own (e.g. parsing command line arguments), they have to be careful to let Turtle fork at the right point.</p>
<p>When running as wasm inside a Worker, initialization is convoluted in a different way. When writing a <code>main()</code> function for a normal OS, all the context you might want is available via environment variables, command line parameters, or of course making syscalls, but there's nothing like that for wasm unless you build it yourself. While you can declare a <a href="https://webassembly.github.io/spec/core/syntax/modules.html#start-function">start function</a> for a wasm module, that doesn't solve our problem since this wasm code depends on knowledge from its environment, like how many pixels are in the canvas it will be drawing to.</p>
<p>While I could have doubled down on "call <code>Turtle::new()</code> at the right point and hope that it will figure it out" by having some wasm-only logic that called into the JS runtime to figure out what it needed, a small macro seemed like a tidier solution. The macro uses conditional compilation to do the right thing when it's compiled for the desktop or for wasm, with straightforward, global-free code in each case.</p>
<p>Before:</p>
<figure class='code'><div class="highlight"><table><tr><td class="gutter"><pre class="line-numbers"><span class='line-number'>1</span>
<span class='line-number'>2</span>
<span class='line-number'>3</span>
<span class='line-number'>4</span>
<span class='line-number'>5</span>
<span class='line-number'>6</span>
</pre></td><td class='code'><pre><code class='rust'><span class='line'><span></span><span class="k">fn</span> <span class="nf">main</span><span class="p">()</span><span class="w"> </span><span class="p">{</span><span class="w"></span>
</span><span class='line'><span class="w">    </span><span class="c1">// Must start by calling Turtle::new()</span>
</span><span class='line'><span class="w">    </span><span class="c1">// Secretly forks a child process and takes over stdout</span>
</span><span class='line'><span class="w">    </span><span class="kd">let</span><span class="w"> </span><span class="k">mut</span><span class="w"> </span><span class="n">turtle</span><span class="w"> </span><span class="o">=</span><span class="w"> </span><span class="n">Turtle</span>::<span class="n">new</span><span class="p">();</span><span class="w"></span>
</span><span class='line'><span class="w">    </span><span class="c1">// write your drawing code here</span>
</span><span class='line'><span class="p">}</span><span class="w"></span>
</span></code></pre></td></tr></table></div></figure>
<p>After:</p>
<figure class='code'><div class="highlight"><table><tr><td class="gutter"><pre class="line-numbers"><span class='line-number'>1</span>
<span class='line-number'>2</span>
<span class='line-number'>3</span>
</pre></td><td class='code'><pre><code class='rust'><span class='line'><span></span><span class="n">run_turtle</span><span class="o">!</span><span class="p">(</span><span class="o">|</span><span class="k">mut</span><span class="w"> </span><span class="n">turtle</span><span class="o">|</span><span class="w"> </span><span class="p">{</span><span class="w"></span>
</span><span class='line'><span class="w">    </span><span class="c1">// write your drawing code here</span>
</span><span class='line'><span class="p">});</span><span class="w"></span>
</span></code></pre></td></tr></table></div></figure>
<p>It's harder for users to screw up, and it opens the way to putting the Turtle logic in its own thread (instead of forking) when running on a desktop. This would allow users to use stdout on the desktop (currently claimed for communication with the child process), and the underpinnings could simply use shared memory instead of doing message passing via json over stdin/stdout. And, of course, it lets us get the right wasm-only initialization code in there too!</p>
<p>Anyway, with that in place, initializing the Worker that hosts the wasm is simple enough (see <a href="https://github.com/sunjay/turtle/pull/53/files#diff-8a5b5909f5b3ce1a25a1c499ab30da2c">worker.js</a>). Following <a href="https://www.hellorust.com/demos/canvas/index.html">Geoffroy Couprie's canvas example</a>, we simply allocate a buffer with 4 bytes (RGBA) per pixel and call this function provided by the <code>run_turtle!</code> macro to kick things off:</p>
<figure class='code'><div class="highlight"><table><tr><td class="gutter"><pre class="line-numbers"><span class='line-number'>1</span>
<span class='line-number'>2</span>
<span class='line-number'>3</span>
<span class='line-number'>4</span>
<span class='line-number'>5</span>
<span class='line-number'>6</span>
</pre></td><td class='code'><pre><code class='rust'><span class='line'><span></span><span class="cp">#[allow(dead_code)]</span><span class="w"></span>
</span><span class='line'><span class="cp">#[cfg(feature = </span><span class="s">&quot;canvas&quot;</span><span class="cp">)]</span><span class="w"></span>
</span><span class='line'><span class="cp">#[no_mangle]</span><span class="w"></span>
</span><span class='line'><span class="k">pub</span><span class="w"> </span><span class="k">extern</span><span class="w"> </span><span class="s">&quot;C&quot;</span><span class="w"> </span><span class="k">fn</span> <span class="nf">web_turtle_start</span><span class="p">(</span><span class="n">pointer</span>: <span class="o">*</span><span class="k">mut</span><span class="w"> </span><span class="kt">u8</span><span class="p">,</span><span class="w"> </span><span class="n">width</span>: <span class="kt">usize</span><span class="p">,</span><span class="w"> </span><span class="n">height</span>: <span class="kt">usize</span><span class="p">)</span><span class="w"> </span><span class="p">{</span><span class="w"></span>
</span><span class='line'><span class="w">    </span><span class="n">turtle</span>::<span class="n">start_web</span><span class="p">(</span><span class="n">pointer</span><span class="p">,</span><span class="w"> </span><span class="n">width</span><span class="p">,</span><span class="w"> </span><span class="n">height</span><span class="p">,</span><span class="w"> </span><span class="cp">$f</span><span class="p">);</span><span class="w"></span>
</span><span class='line'><span class="p">}</span><span class="w"></span>
</span></code></pre></td></tr></table></div></figure>
<p>When a new frame has been rendered, the Rust logic calls into JS, which copies the contents of the pixel buffer and sends it to the main thread, which simply drops it into the <code>&lt;canvas&gt;</code>.</p>
<figure class='code'><div class="highlight"><table><tr><td class="gutter"><pre class="line-numbers"><span class='line-number'>1</span>
<span class='line-number'>2</span>
<span class='line-number'>3</span>
<span class='line-number'>4</span>
<span class='line-number'>5</span>
<span class='line-number'>6</span>
<span class='line-number'>7</span>
</pre></td><td class='code'><pre><code class='javascript'><span class='line'><span></span><span class="kr">const</span> <span class="nx">pixelArray</span> <span class="o">=</span> <span class="k">new</span> <span class="nx">Uint8ClampedArray</span><span class="p">(</span><span class="nx">wasmTurtle</span><span class="p">.</span><span class="nx">memory</span><span class="p">.</span><span class="nx">buffer</span><span class="p">,</span> <span class="nx">pointer</span><span class="p">,</span> <span class="nx">byteSize</span><span class="p">);</span>
</span><span class='line'><span class="kr">const</span> <span class="nx">copy</span> <span class="o">=</span> <span class="nx">Uint8ClampedArray</span><span class="p">.</span><span class="nx">from</span><span class="p">(</span><span class="nx">pixelArray</span><span class="p">);</span>
</span><span class='line'>
</span><span class='line'><span class="nx">postMessage</span><span class="p">({</span>
</span><span class='line'>    <span class="s1">&#39;type&#39;</span><span class="o">:</span>   <span class="s1">&#39;updateCanvas&#39;</span><span class="p">,</span>
</span><span class='line'>    <span class="s1">&#39;pixels&#39;</span><span class="o">:</span> <span class="nx">copy</span>
</span><span class='line'><span class="p">});</span>
</span></code></pre></td></tr></table></div></figure>
<h2>Random number generation</h2>
<p>When Rust is running on a normal OS, it uses <code>/dev/random</code> or equivalent internally to seed a PRNG. However, WebAssembly isn't an OS, so it doesn't offer a source of random numbers (or files, for that matter, in the same way that x86 asm doesn't have files). In practice, this means that Turtle's use of <code>rand::thread_rng()</code> dies with an "unreachable code" error.</p>
<p>Fortunately, implementing our own <code>Rng</code> is pretty straightforward: the only required method is <code>next_u32()</code>, and that much we can do with JavaScript and the browser's PRNG (32 bit ints are pretty sane in JS; major int weirdness starts at 2^52). First, we'll need a JS function to make a random number between <code>0</code> and <code>u32::max_value()</code>, using the normal random range idiom:</p>
<figure class='code'><div class="highlight"><table><tr><td class="gutter"><pre class="line-numbers"><span class='line-number'>1</span>
<span class='line-number'>2</span>
<span class='line-number'>3</span>
<span class='line-number'>4</span>
<span class='line-number'>5</span>
<span class='line-number'>6</span>
</pre></td><td class='code'><pre><code class='javascript'><span class='line'><span></span><span class="nx">web_prng</span><span class="o">:</span> <span class="p">()</span> <span class="p">=&gt;</span> <span class="p">{</span>
</span><span class='line'>    <span class="kr">const</span> <span class="nx">min</span> <span class="o">=</span> <span class="mi">0</span><span class="p">;</span>
</span><span class='line'>    <span class="kr">const</span> <span class="nx">max</span> <span class="o">=</span> <span class="mi">4294967295</span><span class="p">;</span> <span class="c1">// u32 max</span>
</span><span class='line'>
</span><span class='line'>    <span class="k">return</span> <span class="nb">Math</span><span class="p">.</span><span class="nx">floor</span><span class="p">(</span><span class="nb">Math</span><span class="p">.</span><span class="nx">random</span><span class="p">()</span> <span class="o">*</span> <span class="p">(</span><span class="nx">max</span> <span class="o">-</span> <span class="nx">min</span> <span class="o">+</span> <span class="mi">1</span><span class="p">))</span> <span class="o">+</span> <span class="nx">min</span><span class="p">;</span>
</span><span class='line'><span class="p">}</span>
</span></code></pre></td></tr></table></div></figure>
<p>By making that available to the wasm module when it's initialized, we can then make that callable from Rust:</p>
<figure class='code'><div class="highlight"><table><tr><td class="gutter"><pre class="line-numbers"><span class='line-number'>1</span>
<span class='line-number'>2</span>
<span class='line-number'>3</span>
</pre></td><td class='code'><pre><code class='rust'><span class='line'><span></span><span class="k">extern</span><span class="w"> </span><span class="s">&quot;C&quot;</span><span class="w"> </span><span class="p">{</span><span class="w"></span>
</span><span class='line'><span class="w">    </span><span class="k">fn</span> <span class="nf">web_prng</span><span class="p">()</span><span class="w"> </span>-&gt; <span class="kt">u32</span><span class="p">;</span><span class="w"></span>
</span><span class='line'><span class="p">}</span><span class="w"></span>
</span></code></pre></td></tr></table></div></figure>
<p>And then use it in our <code>Rng</code> implementation:</p>
<figure class='code'><div class="highlight"><table><tr><td class="gutter"><pre class="line-numbers"><span class='line-number'>1</span>
<span class='line-number'>2</span>
<span class='line-number'>3</span>
<span class='line-number'>4</span>
<span class='line-number'>5</span>
<span class='line-number'>6</span>
<span class='line-number'>7</span>
<span class='line-number'>8</span>
<span class='line-number'>9</span>
</pre></td><td class='code'><pre><code class='rust'><span class='line'><span></span><span class="k">pub</span><span class="w"> </span><span class="k">struct</span> <span class="nc">WebRng</span><span class="p">;</span><span class="w"></span>
</span><span class='line'>
</span><span class='line'><span class="k">impl</span><span class="w"> </span>::<span class="n">rand</span>::<span class="n">Rng</span><span class="w"> </span><span class="k">for</span><span class="w"> </span><span class="n">WebRng</span><span class="w"> </span><span class="p">{</span><span class="w"></span>
</span><span class='line'><span class="w">    </span><span class="k">fn</span> <span class="nf">next_u32</span><span class="p">(</span><span class="o">&amp;</span><span class="k">mut</span><span class="w"> </span><span class="bp">self</span><span class="p">)</span><span class="w"> </span>-&gt; <span class="kt">u32</span> <span class="p">{</span><span class="w"></span>
</span><span class='line'><span class="w">        </span><span class="k">unsafe</span><span class="w"> </span><span class="p">{</span><span class="w"></span>
</span><span class='line'><span class="w">            </span><span class="n">web_prng</span><span class="p">()</span><span class="w"></span>
</span><span class='line'><span class="w">        </span><span class="p">}</span><span class="w"></span>
</span><span class='line'><span class="w">    </span><span class="p">}</span><span class="w"></span>
</span><span class='line'><span class="p">}</span><span class="w"></span>
</span></code></pre></td></tr></table></div></figure>
<p>All that remained was to adjust how Turtle exposed random numbers so that it would use the appropriate <code>Rng</code> implementation on a desktop OS vs on wasm.</p>
<h1>Conclusion</h1>
<p>Hopefully this has demonstrated that getting Rust code running in the browser via wasm is pretty achievable even for projects that aren't a drop-in fit for the browser's runtime model.</p>
<p>There were other problems to solve (like measuring time, or being able to println for debugging), but this post is already pretty long, so I'll refer you to the <a href="https://github.com/sunjay/turtle/pull/53">pull request</a> if you want all the details.</p>
]]></content></entry><entry><title type="html"><![CDATA[DIY Bike Hoist]]></title><link href="http://varblog.org/blog/2016/01/21/diy-bike-hoist/"/><updated>2016-01-24T17:41:10-06:00</updated><id>/blog/2016/01/21/diy-bike-hoist/</id><content type="html"><![CDATA[<p>It's surprisingly easy to end up with a multi-bike household, and inevitably some of those bikes need to be stored somewhere out of the way. This guide will show you how to build a strong and safe bike hoist that makes it easy to lift your bikes overhead when you're not using them.</p>
<p>There are a few existing retail options like <a href="http://www.amazon.com/RAD-Cycle-Products-Bike-Hoist/dp/B000PEURIQ">this one</a> or <a href="http://www.harborfreight.com/bicycle-lift-95803.html">Harbor Freight's amazingly cheap one</a>, and some other <a href="http://www.instructables.com/id/Bicycle-Hoist-or-%22How-to-get-the-wife-s-bike-out-o/">DIY guides</a>. However, none of these suited my requirements:</p>
<ul>
<li>I have exposed beams in my ceiling, and I wanted the hoist to be able to sit up between the beams so the bikes could be up higher. Hoists that expect a flat ceiling are out.</li>
<li>I want to hold the bike up in such a way that it can't be easily knocked down. I will have multiple bikes side by side, so I don't want one to knock the other off as I move them about, and I also live in an earthquake-prone part of the world. The exising bike hoist kits used hooks that could let the bike fall if bumped.</li>
<li>I want to suspend the bikes in a way that won't harm the bikes. Seat and handlebars are fine, and so are wheels, but some bike storage options have the bike suspended by its top tube <a href="http://coolmaterial.com/feature/store-a-bike-in-style/">like these abominations</a>, which is a no-go. Read your bike manual; I bet it says not to do that.</li>
<li>I want to be quite confident in the strength of the system since I'll be walking beneath it, so I want more than stamped sheet metal parts.</li>
</ul>
<p>I settled on the following layout:</p>
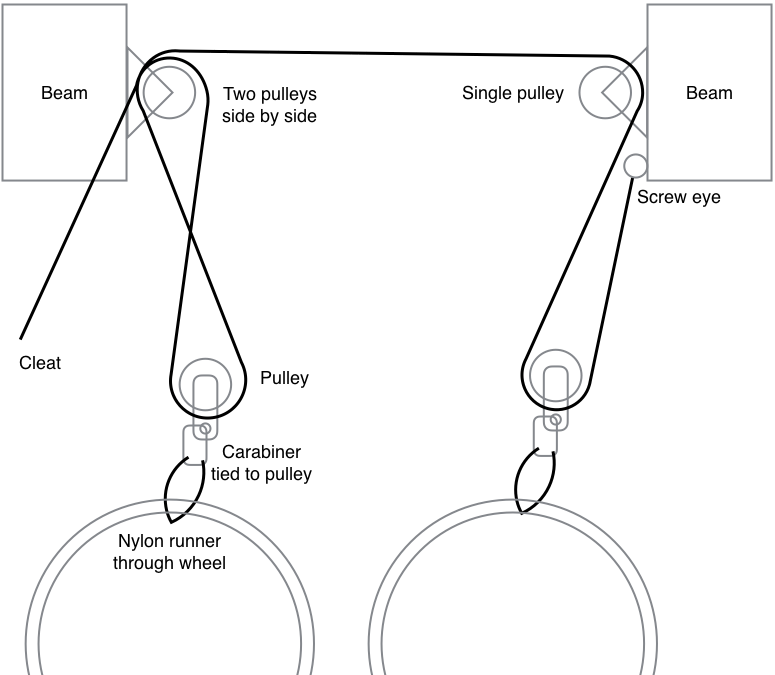
<p><img src="/images/bike-hoist/schematic-4ce79edc4872bdee723c50880ec64437.png" /></p>
<p>To build this, you'll need the following:</p>
<ul>
<li>3x <a href="http://www.homedepot.com/p/Crown-Bolt-1-1-2-in-Zinc-Plated-Wall-Ceiling-Mount-Pulley-64634/203001587">ceiling/wall-mount pulleys</a>. These will be screwed in place. I used 1 1/2" pulleys.</li>
<li>2x <a href="http://www.homedepot.com/p/Everbilt-1-1-2-in-Zinc-Plated-Rigid-Single-Pulley-44144/205887587">regular pulleys</a>. These will be hanging from ropes.</li>
<li>1x <a href="http://www.homedepot.com/p/Everbilt-5-16-in-x-4-in-Zinc-Plated-Lag-Thread-Screw-Eye-806926/204273852">fair-sized screw eye</a>. This will be where one end of the rope is tied off.</li>
<li>9x #14 screws, 3 for each ceiling pulley. Since the head will be tight against the pulley body, try to get a "<a href="https://en.wikipedia.org/wiki/Screw#Cheese_head">cheese head</a>", "pan head", or "button head" screw, as opposed to countersunk or "flat head". Countersunk screws will be strong enough and all that; it just won't look as tidy. They should be as long as possible given how much wood you have available, e.g. a 3" screw if you're going into a 2x4, plus drywall, etc. #14 is what fits into the pulleys I've linked to, so if you get different pulleys just use the largest size that fits.</li>
<li>1x <a href="http://www.westmarine.com/buy/west-marine--nylon-cleats--P002_064_005_502">8" cleat</a>. This will be where the rope is tied and untied when raising or lowering the bike.</li>
<li>2x #14 screws for the cleat, as long as will fit into whatever wood you are screwing into. Make sure to take into account the height of the cleat, drywall, etc. The cleats I have have countersunk holes, so countersunk screws are fine here.</li>
<li>2x <a href="http://www.rei.com/product/471041/black-diamond-oval-carabiner">carabiners</a>. Plain old oval non-locking carabiners work great. I wouldn't use the toy carabiners that come with water bottles and such; if you're trying to save a buck and compromise safety this isn't the project for you.</li>
<li>2x <a href="http://www.rei.com/product/722354/black-diamond-18mm-nylon-runners">30cm nylon climbing runners</a>. Nylon is soft and won't chew up your bike wheels, which might be carbon or something similarly delicate.</li>
<li>A few feet of some sturdy cord like paracord for tying the carabiners to the pulleys if the carabiner won't fit through the pulley hole.</li>
<li>Rope. I used some old climbing rope. How much depends on how high you need to raise the bike, how far apart you place the pulleys, etc. 40' is likely to be enough.</li>
</ul>
<p>You'll also want some tools:</p>
<ul>
<li>Drill and drill bit (I used 1/8" for #14 screws) for predrilling holes for screws</li>
<li>Measuring tape and a level</li>
<li>Impact driver or other power screwdriver</li>
<li>Hammer and punch, nail, awl, or other way of making a small pilot hole so you can predrill without the drill bit "wandering"</li>
<li>Ladder</li>
<li>Lighter, heat gun, or other way of melting the ends of cut synthetic rope</li>
</ul>
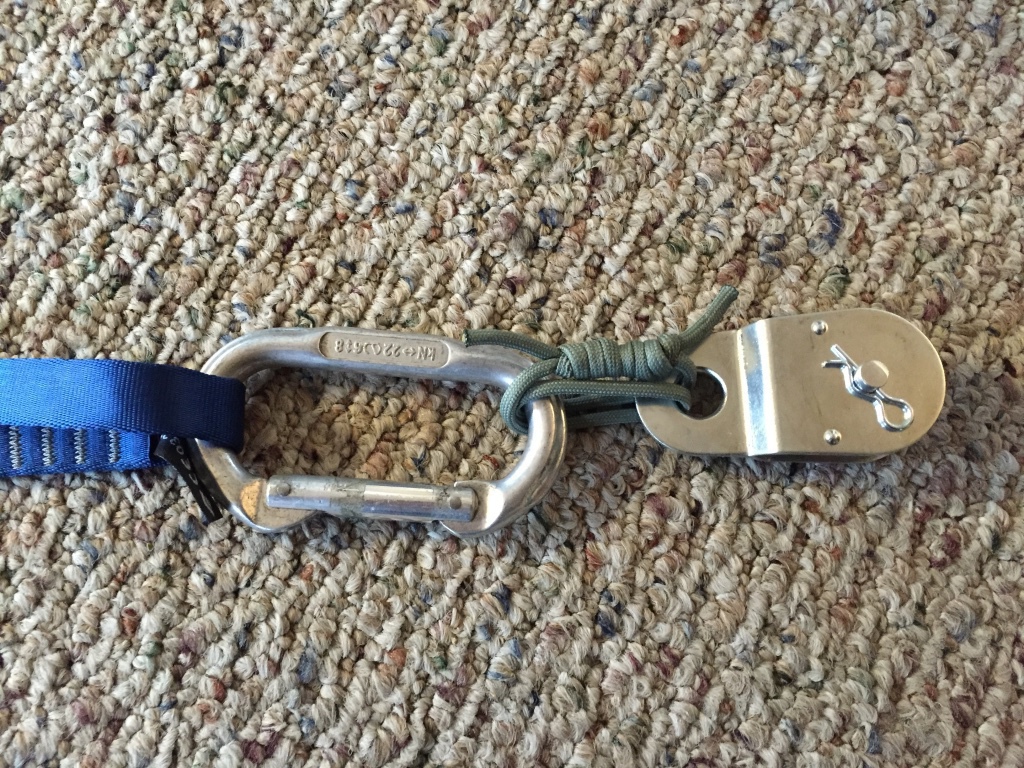
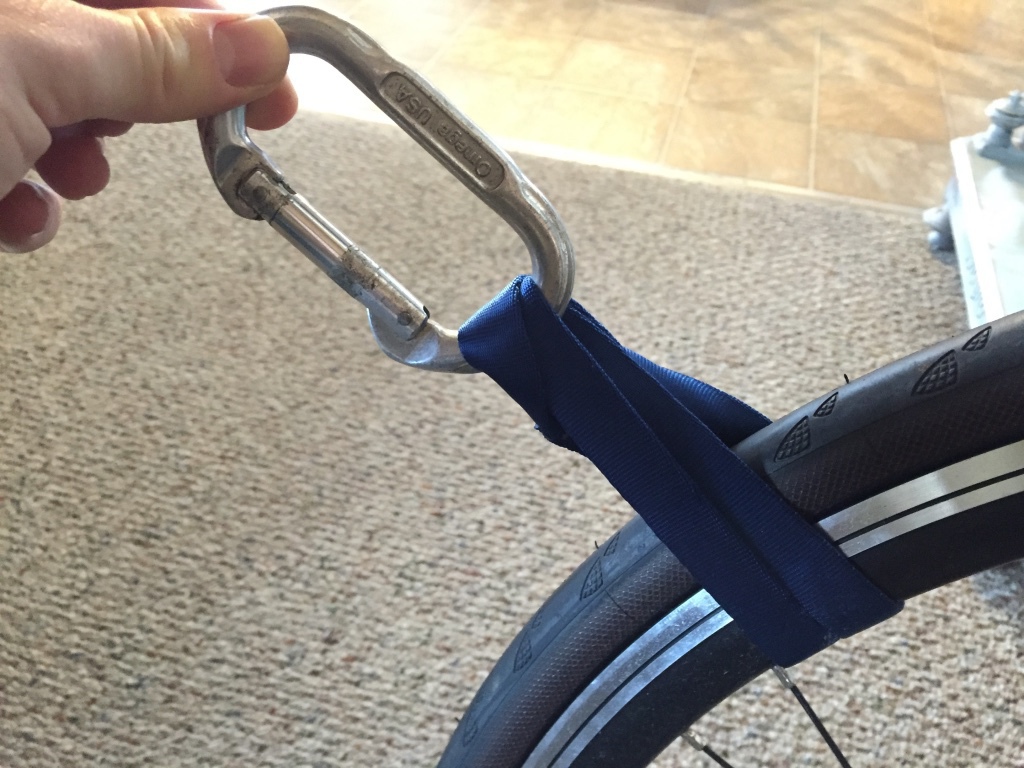
<p>Once you have all that, you're ready to begin. First, assemble the part that will actually be hooked to your bike. If your carabiners won't fit through the hole in the pulley, tie them together with some cord. I used paracord with a <a href="http://www.animatedknots.com/doublefishermans/index.php?Categ=typebends&amp;LogoImage=LogoGrog.png&amp;Website=www.animatedknots.com#ScrollPoint">fisherman's bend</a>. Since we're trying to minimize vertical space, I wrapped the cord around an extra time so that whatever slack I introduced while tying would not enlarge the loop so much. Melt the cut ends of the paracord so they don't fray. Clip a runner through each carabiner.</p>
<p><img src="/images/bike-hoist/carabiner-f6a1b5613c559b0af95e11b96061cbe0.jpg" /></p>
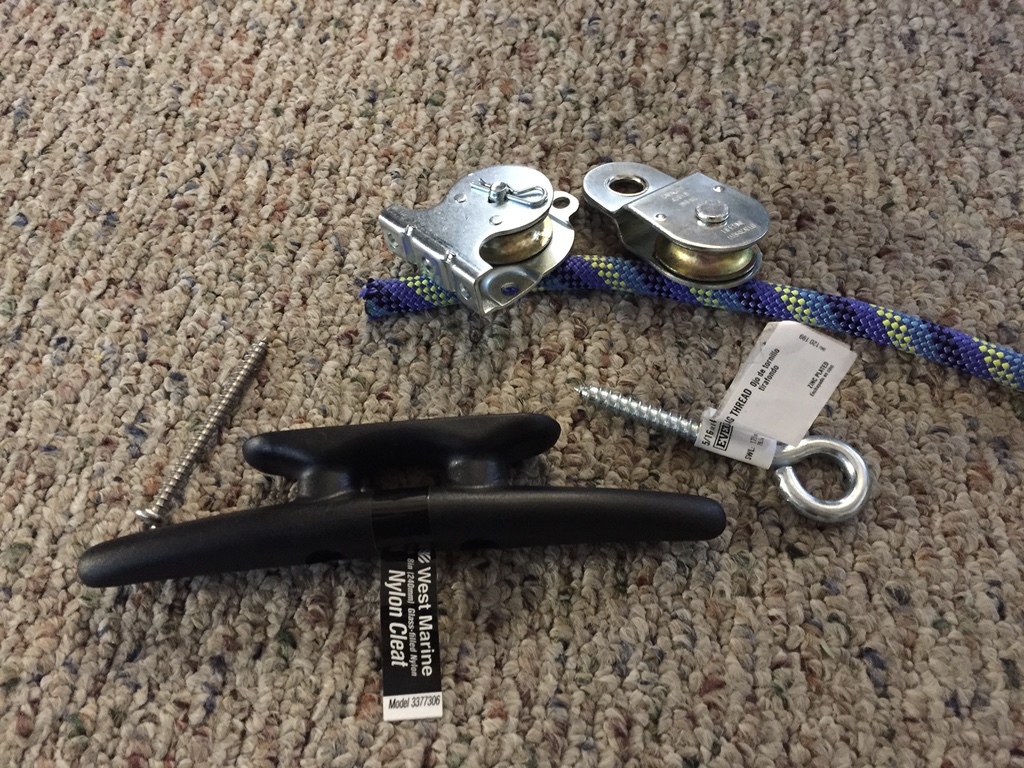
<p>You'll need to take the wheel out of the ceiling pulleys to be able to mount them, so remove the cotter pin and pull out the axle.</p>
<p><img src="/images/bike-hoist/hardware-84fd762d2064f20eb7076328c3b82a7d.jpg" /></p>
<p>Map out where you want to put your pulleys. Use the tape and level if you're not mounting to a flat ceiling to make sure you're not laying it out crooked. I used a pencil to trace the outline of each of the three holes in the pulley frame while holding it in place, then used a pin punch and hammer to make a mark in the center of my pencil circle. You can then predrill for your screws, using the small indent from the punch/awl/whatever to keep the drill point steady when it starts the hole. Don't forget to predrill for the screw eye too; it might need a different size drill bit.</p>
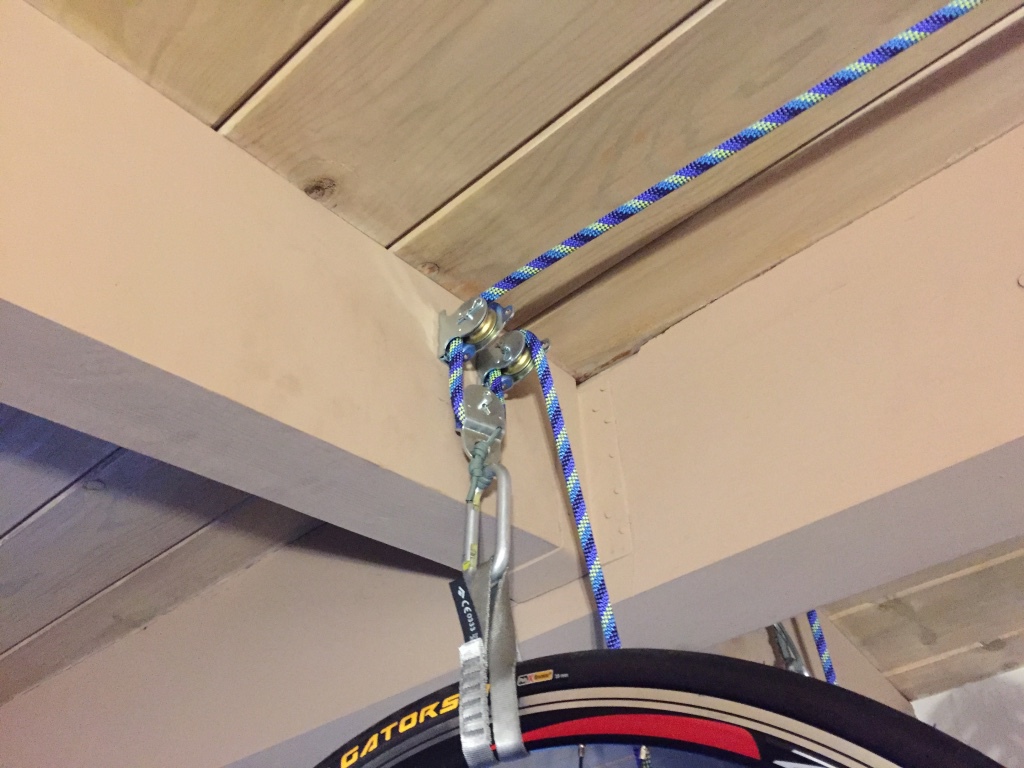
<p>On the side where you'll place the cleat, attach two pulleys with screws. Put the axle, wheel, and cotter pin back in once the frame is screwed on. In my case, the cleat isn't directly below the pulleys, so I've mounted them with the bulkier part of the frame facing the cleat so that when the rope is angled down to the cleat it won't tend to shift off of the pulley.</p>
<p><img src="/images/bike-hoist/cleatside-e7d82dac78bb0bc4535da8a45944bbc5.jpg" /></p>
<p>On the other side, mount the remaining pulley and the screw eye. Stick a screwdriver or other strong metal bar through the screw eye and use that to get leverage as you turn it.</p>
<p><img src="/images/bike-hoist/farside-628c05e45b4d7fb1160422e70a70b6c7.jpg" /></p>
<p>As you install the pulleys and the screw eye, loop your rope over each one and pull down hard to make sure it's securely mounted. Make sure to climb off the ladder first before you test!</p>
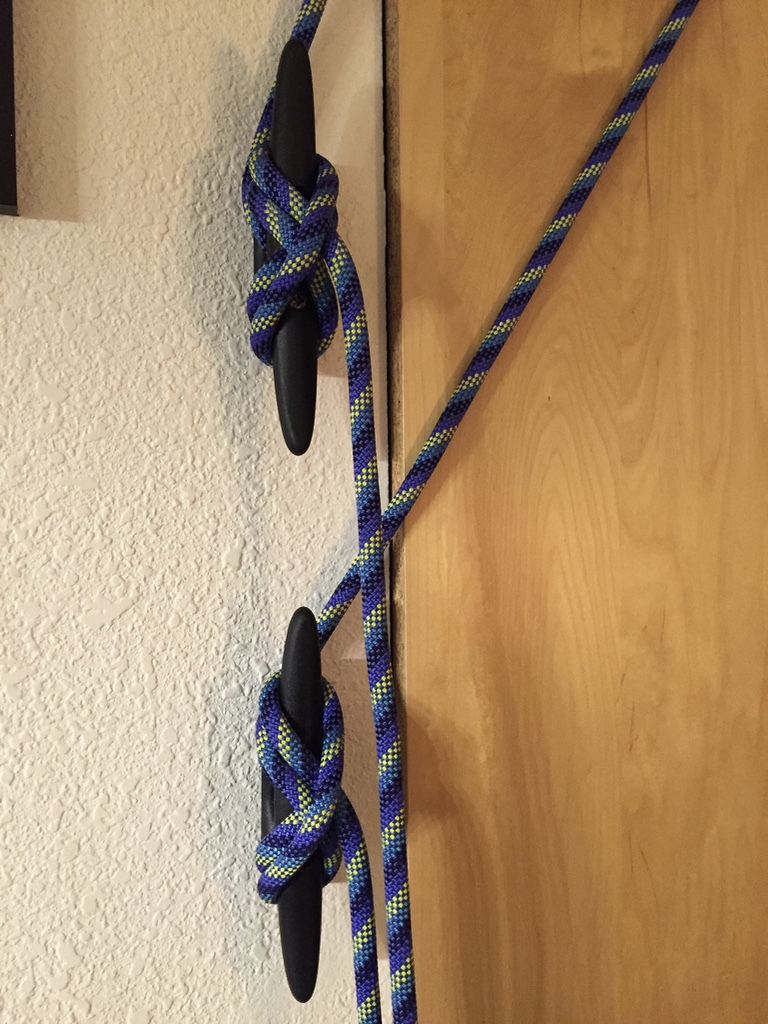
<p>Pick a place for the cleat to go. Somewhere between waist and head high is probably good, as you'll want to be able to comfortably apply a little force as you work with the rope. Hold the cleat in place, mark with the pencil, and punch two more starter holes. The guys at West Marine told me to put some wood glue on the threads of the screws to help prevent them from backing out. Probably overkill for the light load of 20lbs of bicycle and pulleys, but I had some wood glue anyway so I did that too. Anyway, predrill and then screw in your cleat.</p>
<p><img src="/images/bike-hoist/cleats-1bb1f91877025065804cf2bb9e5be093.jpg" /></p>
<p>I've got two of these setups, hence the two cleats.</p>
<p>Now you're ready to start assembling the whole thing. Tie off one end of your rope on the screw eye. I first used a figure-8 knot, but then settled on a <a href="http://www.animatedknots.com/bowline/index.php?LogoImage=LogoGrog.png&amp;Website=www.animatedknots.com#ScrollPoint">bowline</a> because it allowed me to get a smaller knot that was closer to the screw eye, allowing me to pull the bike up higher because there was less knot in the way. The bowline, though compact, can slip some when not loaded, so leave a bit of rope on the tail end. I stuck a stopper knot on there too just in case. It's not much of a concern because there will always be at least the pulley's weight keeping the knot a little loaded.</p>
<p>Now that you have something to pull against, uncoil the rest of your rope and let it untwist if it needs to. If your rope still has some twist in it from the way it was stored, it will cause the pairs of rope that go down to the hanging pulleys to twist on themselves.</p>
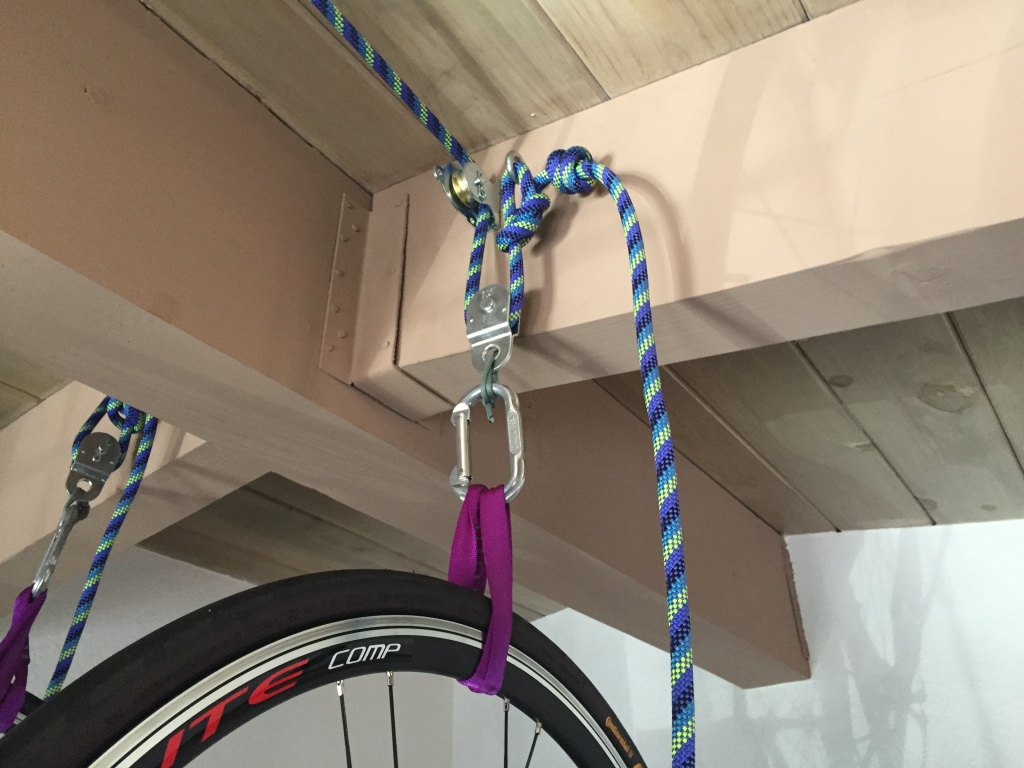
<p>Work the free end of your rope through a hanging pulley, back up to the mounted pulley next to the screw eye, over the top to a mounted pulley on the other side, down to the second hanging pulley, back up and over the remaining mounted pulley, and down to the cleat. The cleat has a central hole, so run the rope around one of the sides and through that, as this will give you the ability to tie a stopper knot to prevent the rope from coming all the way out of the cleat.</p>
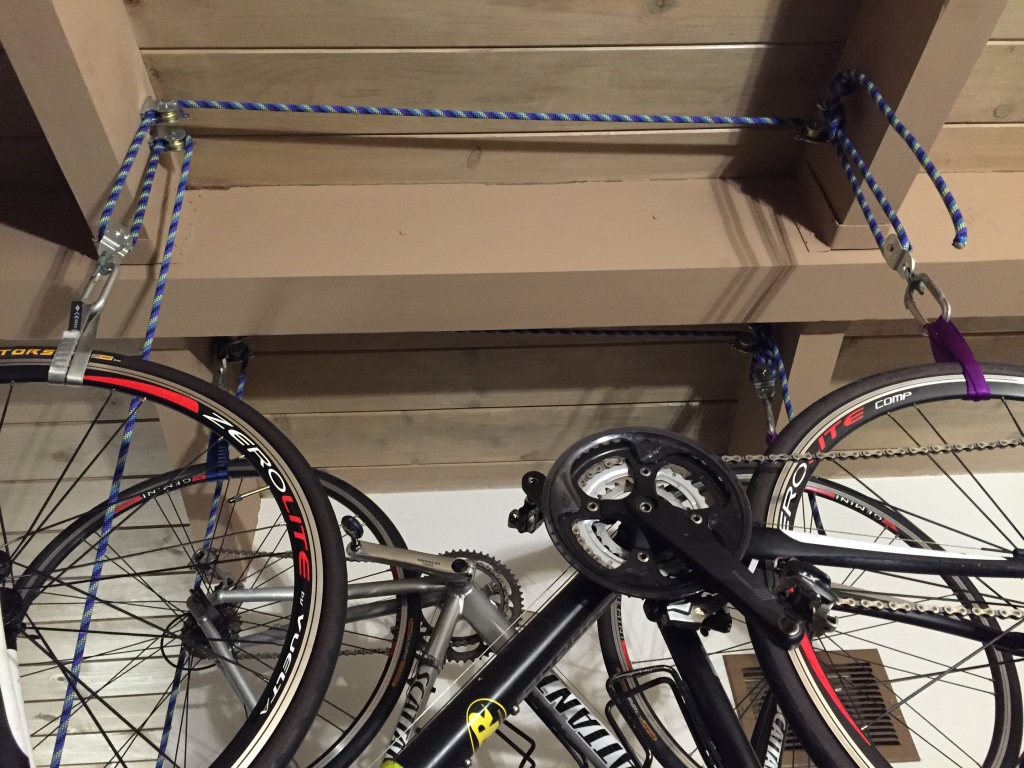
<p>Feed rope into the system so that the pulleys, carabiners, etc are about bike-height. Flip a bike over onto its seat and handlebars, then work the free loop of the runners around the rim and clip the loop into the carabiner.</p>
<p><img src="/images/bike-hoist/runners-cae3b6fed62437d002822f1c7bdb7814.jpg" /></p>
<p>Pull the rope so that the bike is at the height you want when you load and unload and tie a <a href="http://www.animatedknots.com/doubleoverhand/index.php?Categ=typestoppers&amp;LogoImage=LogoGrog.png&amp;Website=www.animatedknots.com#ScrollPoint">stopper knot</a> right at the cleat. The bike should now hang by itself against the stopper knot in the cleat hole.</p>
<p>Pull the rope so that the system goes up. You may need to pause and push up one side or another. Because of friction in the pulleys, the end closest to the cleat will probably go up first, but you can simply push up the other end by hand and it will equalize. Once you've got it as high as you want, tie a few figure 8s around the cleat, finishing with one that pinches the free end under the loop (see the picture above of the cleats). Done!</p>
<p><img src="/images/bike-hoist/overview-c5e9ef7d67f3de430e92c34a7e3e9dd2.jpg" /></p>
]]></content></entry><entry><title type="html"><![CDATA[Developers debate unimportant things]]></title><link href="http://varblog.org/blog/2015/03/29/developers-debate-unimportant-things/"/><updated>2015-03-29T17:18:17-05:00</updated><id>/blog/2015/03/29/developers-debate-unimportant-things/</id><content type="html"><![CDATA[<p>The other day I read a disappointing screed by a determined developer. The specific text is unimportant, but I'm sure you've read plenty just like it: claims about technology X that the author doesn't like, while simultaneously promoting technology Y that they do like as a technological panacea. Now you know why the specific article is irrelevant -- it could be Sass vs Less, or CoffeeScript vs Dart, or Maven vs Gradle, or K&amp;R vs BSD curly brace placement, and any of those hypothetical articles could be extracted from another with find and replace.</p>
<p>Consider the case of a hypothetical team with a background in technology <em>X</em> that starts a new project in (or migrates to) technology <em>Y</em>. The new work goes well, and the team is enthused about <em>Y</em>. The question is, though, how important is <em>Y</em> specifically to the success of the project? Sometimes, of course, there are cases where technology choice can be a huge factor. Trying to write firmware for an embedded device with an 8K ROM in C++ template metaprogramming (it's Turing-complete, so why not?) is probably not going to go well. I'll set aside these hyperbolic cases, though, as they're rare and easily avoided with a little googling. Let's go back to our hypothetical team and consider the contributions of the following aspects of their successful project:</p>
<ul>
<li>Choosing <em>Y</em> instead of sticking with <em>X</em> or choosing another option <em>Z</em></li>
<li>The architectural cleanliness that comes from an at least partially blank slate</li>
<li>Having team members who care about improvement</li>
<li>Having team members who know that improvement is possible</li>
<li>Engineering leadership's trust in the team's decisions on what to do</li>
<li>The organizational health needed to work around a departure from the business-as-usual schedule</li>
<li>The corporate political bonhomie needed to allow the engineering organization to innovate rather than take the safe road of continuing with what they already have</li>
</ul>
<p>I assert that in the common case, the success or failure of a project generally has little to do with the specific technology used. In one way, this is not a radical assertion: the importance of organizational structure, team culture, and other such intangibles has been known for decades. (This is what management is all about, after all.) My point is that even though technology usually isn't the important part, <em>developers argue as if it is</em>. Developers are generally detail oriented, and many (though not all) are also equipped with a surfeit of opinions. Consider topics like compile time vs runtime type checking, Java vs Scala, tabs vs spaces... We can quantify these topics, so we can bring facts (or at least aesthetics) to bear as we bicker over relative merits. My own experience is, of course, only anecdotal evidence, but across the projects I've been involved in both as a regular employee and as a consultant, the choice of technology hasn't been nearly as important to overall productivity as the team's engineering maturity, organizational health, etc. In conversation with fellow technologists, I've found I'm not the only one.</p>
<p><img src="/images/developers-debate-unimportant-things-0d15db1e1d5af7724c0cc8c0b4701511.png" /></p>
<p>It's understandable that we might tend to attach too much importance to the things that we know well and have some control over, so where do we go from here? I definitely don't want to write off the value of a good ol' my-type-inference-is-better-than-your-type-inference debate; we all learn a lot from the exchange of ideas. Instead, I think that when we debate such things we have to keep in mind that it's only a small part of success, and that ultimately the specific technology probably doesn't matter much. If you have an opportunity to adopt your technology-du-jour because your team has the political will and organizational freedom to do so, you will have necessarily already succeeded at the hard part: being part of an organization that allows for success in the first place. On the other hand, if you're struggling to get momentum adopting a technology that you're confident will help your project, consider that the tech isn't your problem: it's that you're the only one clamoring for improvement.</p>
]]></content></entry><entry><title type="html"><![CDATA[Blogging with Grain and S3]]></title><link href="http://varblog.org/blog/2014/01/05/blogging-with-grain-and-s3/"/><updated>2015-06-09T22:52:37-05:00</updated><id>/blog/2014/01/05/blogging-with-grain-and-s3/</id><content type="html"><![CDATA[<p>I prefer static site generators when it comes to blogging: they're easy to store in version control, and they're pretty bulletproof security-wise. I'd used <a href="http://octopress.org/docs/">Octopress</a> before, as well as plain <a href="http://jekyllrb.com/">Jekyll</a>, and though I liked the concept, in practice neither worked smoothly: the whole gem infrastructure is kinda messy, and "watch for changes" mode didn't work reliably. So, when I saw a blurb about <a href="http://sysgears.com/grain/">Grain</a>, a static site generator written in Groovy, I investigated and was pleased to see that it (1) had an Octopress theme clone for easy blog setup, (2) was written with (IMO) best-in-class tech choices: Groovy, Guice, and Gradle, and (3) had watch-for-changes that actually worked.</p>
<h2>Grain</h2>
<p>This blog uses the <a href="http://sysgears.com/grain/themes/octopress/">Octopress theme</a> for <a href="http://sysgears.com/grain/">Grain</a>. I chose to <a href="https://github.com/marshallpierce/varblog.org">fork (see the varblog branch)</a> the <a href="https://github.com/sysgears/grain-theme-octopress">main octopress theme repo</a> so that I could more easily incorporate future improvements, rather than starting a new repo using a released version. Especially as Grain matures, you may wish to just take a released version and go from there, but for now using a fork has been fine, and it's let me easily make pull requests as I make improvements that could be generally useful to other users.</p>
<p>I encourage interested readers to go look at <a href="https://github.com/marshallpierce/varblog.org/commits/varblog">the commits in my fork</a> to see all the setup steps I took, but I'll point out one in particular. My Linux system used Python 3 by default, which wasn't compatible with the version of Pygments bundled with Grain. So, to change it to look for python 2 first, I added the following to my SiteConfig in the <code>features</code> section:</p>
<figure class='code'><div class="highlight"><table><tr><td class="gutter"><pre class="line-numbers"><span class='line-number'>1</span>
<span class='line-number'>2</span>
<span class='line-number'>3</span>
</pre></td><td class='code'><pre><code class='html'><span class='line'><span></span>    python {
</span><span class='line'>        cmd_candidates = [&#39;python2&#39;]
</span><span class='line'>    }
</span></code></pre></td></tr></table></div></figure>
<h2>S3 Hosting</h2>
<p>Hosting static output in S3 is pretty common. The speed and reliability of S3 is tough to beat, and even though it's non-free, for most people hosting a blog on S3 will cost less than $1 a month.</p>
<p>I first created an S3 bucket named the same thing as the domain (<code>varblog.org</code>). I enabled static website hosting for the bucket (using <code>index.html</code> as the index document) and set the bucket policy to allow GetObject on every object:</p>
<figure class='code'><div class="highlight"><table><tr><td class="gutter"><pre class="line-numbers"><span class='line-number'>1</span>
<span class='line-number'>2</span>
<span class='line-number'>3</span>
<span class='line-number'>4</span>
<span class='line-number'>5</span>
<span class='line-number'>6</span>
<span class='line-number'>7</span>
<span class='line-number'>8</span>
<span class='line-number'>9</span>
<span class='line-number'>10</span>
<span class='line-number'>11</span>
<span class='line-number'>12</span>
<span class='line-number'>13</span>
<span class='line-number'>14</span>
<span class='line-number'>15</span>
</pre></td><td class='code'><pre><code class='html'><span class='line'><span></span>{
</span><span class='line'>    &quot;Version&quot;:   &quot;2008-10-17&quot;,
</span><span class='line'>    &quot;Id&quot;:        &quot;Policy1388973900126&quot;,
</span><span class='line'>    &quot;Statement&quot;: [
</span><span class='line'>        {
</span><span class='line'>            &quot;Sid&quot;:       &quot;Stmt1388973897544&quot;,
</span><span class='line'>            &quot;Effect&quot;:    &quot;Allow&quot;,
</span><span class='line'>            &quot;Principal&quot;: {
</span><span class='line'>                &quot;AWS&quot;: &quot;*&quot;
</span><span class='line'>            },
</span><span class='line'>            &quot;Action&quot;:    &quot;s3:GetObject&quot;,
</span><span class='line'>            &quot;Resource&quot;:  &quot;arn:aws:s3:::varblog.org/*&quot;
</span><span class='line'>        }
</span><span class='line'>    ]
</span><span class='line'>}
</span></code></pre></td></tr></table></div></figure>
<p>I made a Route 53 hosted zone for <code>varblog.org</code> (remember to change your domain's nameservers to be Route 53's nameservers) and set up an alias record for <code>varblog.org</code> to point to the S3 bucket.</p>
<h2>Uploading to S3</h2>
<p>I created a dedicated IAM user for managing the bucket and gave it this IAM policy:</p>
<figure class='code'><div class="highlight"><table><tr><td class="gutter"><pre class="line-numbers"><span class='line-number'>1</span>
<span class='line-number'>2</span>
<span class='line-number'>3</span>
<span class='line-number'>4</span>
<span class='line-number'>5</span>
<span class='line-number'>6</span>
<span class='line-number'>7</span>
<span class='line-number'>8</span>
<span class='line-number'>9</span>
<span class='line-number'>10</span>
<span class='line-number'>11</span>
<span class='line-number'>12</span>
<span class='line-number'>13</span>
<span class='line-number'>14</span>
<span class='line-number'>15</span>
<span class='line-number'>16</span>
<span class='line-number'>17</span>
<span class='line-number'>18</span>
<span class='line-number'>19</span>
<span class='line-number'>20</span>
<span class='line-number'>21</span>
<span class='line-number'>22</span>
<span class='line-number'>23</span>
<span class='line-number'>24</span>
<span class='line-number'>25</span>
</pre></td><td class='code'><pre><code class='html'><span class='line'><span></span>{
</span><span class='line'>    &quot;Version&quot;:   &quot;2012-10-17&quot;,
</span><span class='line'>    &quot;Statement&quot;: [
</span><span class='line'>        {
</span><span class='line'>            &quot;Sid&quot;:      &quot;Stmt1388973098000&quot;,
</span><span class='line'>            &quot;Effect&quot;:   &quot;Allow&quot;,
</span><span class='line'>            &quot;Action&quot;:   [
</span><span class='line'>                &quot;s3:*&quot;
</span><span class='line'>            ],
</span><span class='line'>            &quot;Resource&quot;: [
</span><span class='line'>                &quot;arn:aws:s3:::varblog.org/*&quot;
</span><span class='line'>            ]
</span><span class='line'>        },
</span><span class='line'>        {
</span><span class='line'>            &quot;Sid&quot;:      &quot;Stmt1388973135000&quot;,
</span><span class='line'>            &quot;Effect&quot;:   &quot;Allow&quot;,
</span><span class='line'>            &quot;Action&quot;:   [
</span><span class='line'>                &quot;s3:*&quot;
</span><span class='line'>            ],
</span><span class='line'>            &quot;Resource&quot;: [
</span><span class='line'>                &quot;arn:aws:s3:::varblog.org&quot;
</span><span class='line'>            ]
</span><span class='line'>        }
</span><span class='line'>    ]
</span><span class='line'>}
</span></code></pre></td></tr></table></div></figure>
<p>This allows that user to do everything to the <code>varblog.org</code> bucket and its contents, but not to do any other AWS actions. I created an Access Key for the user in the IAM console and used it to configure <a href="http://s3tools.org/s3cmd"><code>s3cmd</code></a> with <code>s3cmd --configure -c ~/.s3cfg-varblog.org</code>. This creates a separate config file which I then reference in the <code>s3_deploy_cmd</code> in <code>SiteConfig.groovy</code>. This way, even though I'm storing an access key &amp; secret unencrypted on the filesystem, the credentials only have limited AWS privileges, and I'm not conflating this <code>s3cmd</code> configuration with other configurations I have. Note that when configuring <code>s3cmd</code>, it will ask if you want to test the configuration. Don't bother, as this test will fail: it tries to list all buckets, but this isn't allowed in the IAM user's policy.</p>
<p>At this point, <code>./grainw deploy</code> will populate the bucket with the generated contents of the site.</p>
<h2>Other stuff</h2>
<p>For Google Analytics and Disqus I simply created new sites and plugged in the appropriate ids in <code>SiteConfig</code>. I chose to update the GA snippet template since by default new GA accounts use the "universal" tracker which has a different snippet than good old <code>ga.js</code>. If your GA account is old-school, you should be able to leave the template as-is.</p>
<p>Other than that, all I did was tweak some <code>SASS</code> in <code>theme/sass/custom</code>.</p>
<h2>What's with the name?</h2>
<p>If you're not a Linux/Unix user, this blog's name will make no sense. Then again, the rest of this post probably didn't either. The <code>/var/log</code> directory is historically where log files have gone on Unix-y systems, and 'blog' is kind of like 'log'. Or, put another way, I thought it was amusing when I registered this domain long, long ago.</p>
]]></content></entry></feed>